DIY Bridge Motorsport Ground Kit + Review
 02-25-2004
#1
Bobaganoosh!
Hey! Look At Me!! I'm a Supporting Member!!
Thread Starter
iTrader: (8)
Join Date: Apr 2002
Location: Poco, B.C. Canada
Age: 48
Posts: 26,704
Likes: 0
Received 0 Likes
on
0 Posts
Rep Power: 539 

Bridge Motorsport Custom Machined Central Ground System DIY and Review
This thread was made to demonstrate the effects of my Bridge Motorsport Grounding kit on my 2001 Civic EX/Si and document the installation. I have several pictures that will show what I believe to be the ideal installation for this vehicle and detail each contact point by location. I’ll finish it up with my up to now review of this kit as well. This is my frist DIY . Also, sorry for the dirty engine guys and gals but it is winter afterall..haha
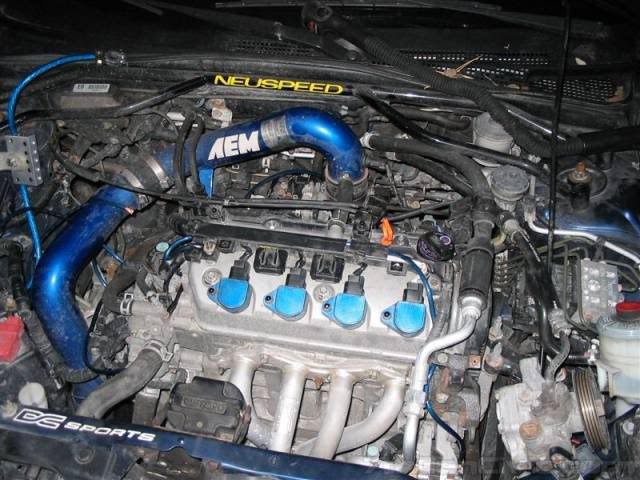
*Note: The block was mounted to the bracket used for the OEM air cleaner system. This bracket is available since it is not used for the Cold Air Intake that is shown here.*
This is the full kit. The main difference between this and what you receive is pretty basic.
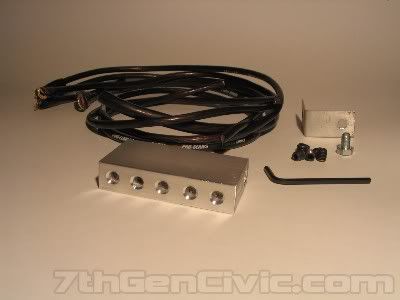
1) The ‘L’ shaped bracket you see there is straight which will work better for the 7thgen anyway.
2) I think there’s more wire included, actually I’m pretty sure I got more than that. Mine are Blue so they match up with my gear.
Best thing to do is map out your setup. Check your cables and make sure you know which ones are going to go where. It’s not about the gage of the cable, it’s about the location and whether it will reach where you plan to put the block without being to tight.
You can leave the thicker of the cables out since it will be used as the new ground on your battery. Those stupid OEM shoelace ground wires are going to get tossed out. Haha.
My installation was setup to hide the wires as much as possible. In one location we actually used a lot less of one wire than was made available.
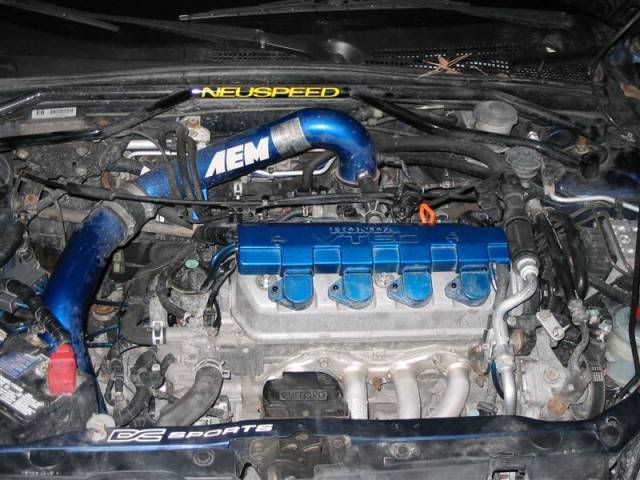
First it’s probably important to re-emphasize where the block is located so you can measure your cable lengths. It’s on the left of the picture where the OEM air cleaner used to be. There’s a bracket there that you can mount to. For now just recognize the location.
Now disconnect the battery and get started.
NOTE: It's a very good idea to use di-electric grease on all the connections.
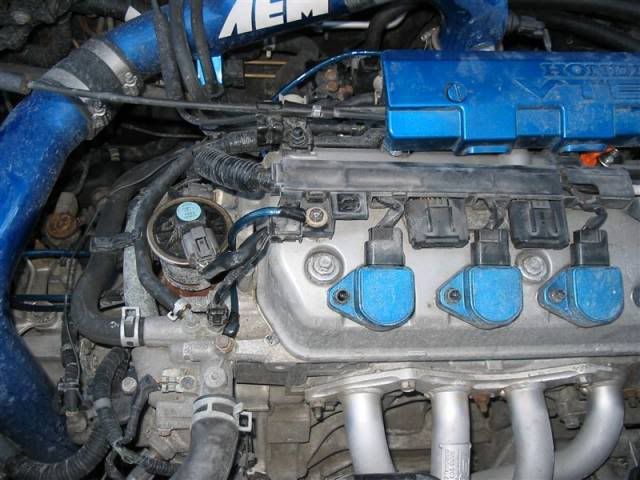
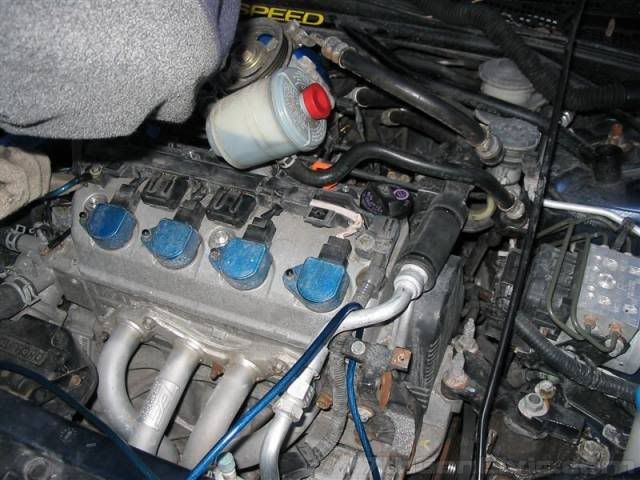
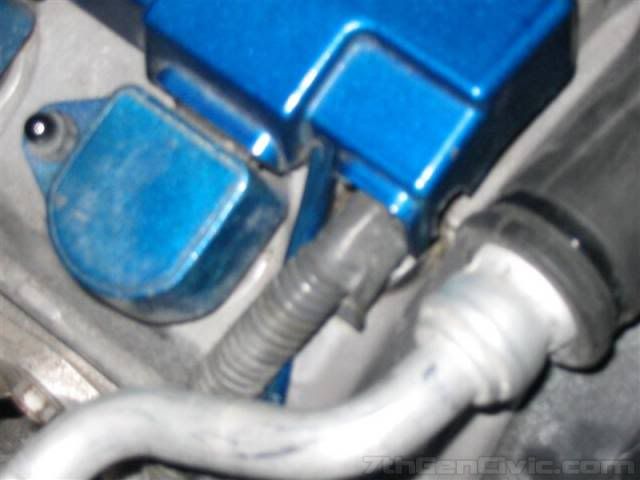
First wire can go to the Valve cover. Remove the engine cover and attach the cable to the point shown here.
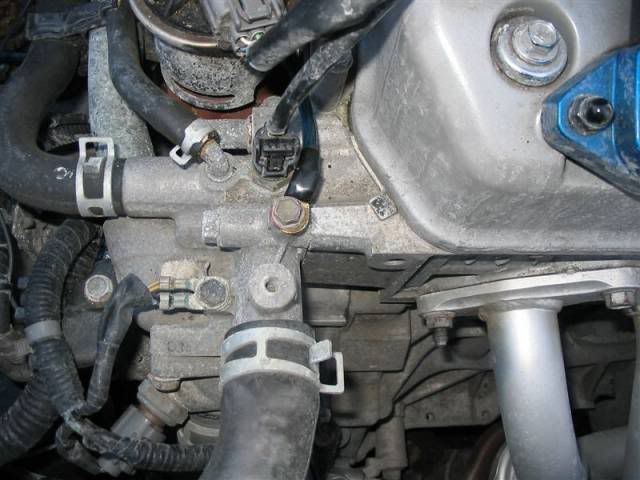
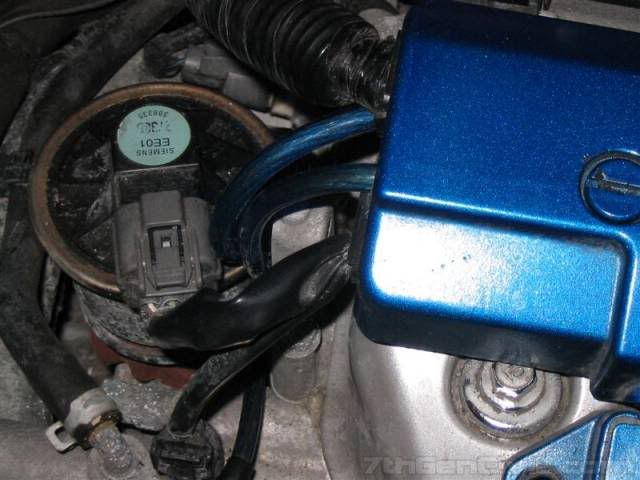
Next connect a wire to the upper thermostat housing like this.
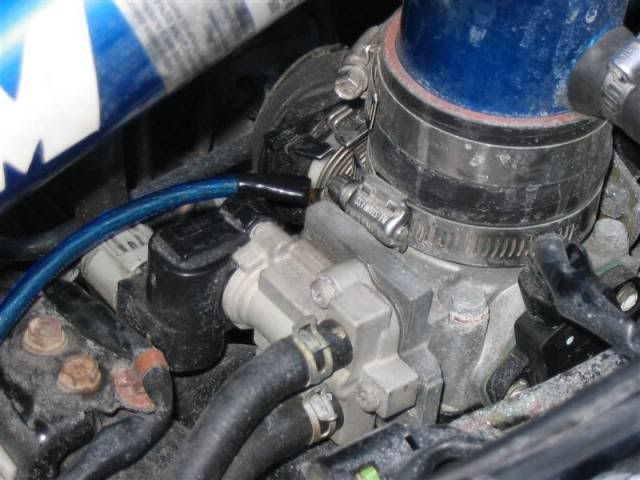
Run one wire to the Throttle Body. As you can see the position is tight to the lower hose clamp on the intake. If this is the case for you as well you just have to slide it over a bit.
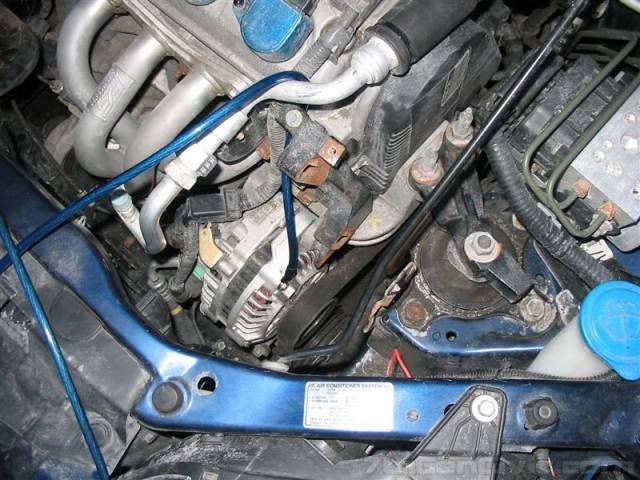
Ok. This is the part that sucks if you don’t have a lift or a way to get the car off the ground so you can get underneath….The Alternator. We had to go in from the top since we couldn’t get the car off the ground. This means that the Power Steering pump has to come out unless you have girlish arms and hands. Here’s the mess we made…hehe.
Once you have it out of the way you can get to the left side of the Alternator. There’s a housing bolt there that is perfect for another ground point. Note the way the cable is strung, this is important to how the cable is going to get run back to the block.
Now flip the plastic guard up that covers the wires for the coil packs (this can be kind of tricky).
Run the wire from the Alternator across there.
Once the cable is run across, snap the inside wire cover back in place checking not to pinch the cables. Note how the cable runs up next to the far right coil pack. Should look like this. You can leave this open until the lengths to the block are verified but closing it will keep the cables in place throughout the installation.
Time to ‘Fabricate’
You’ll need to use a dremmel tool or something that can grind the openings for the cables as they’ll need to be made a little bigger.
Here’s the left side of the cover with another opening notched out for the ground cable.
With the cover back in place you should be able to get the cable from the Alternator into the opening on the far right as shown below. Do not fasten it down yet. Wait until the end to make sure your cables are all going to reach. Just test the fit.
The left side of the cover should look like this once in place.
Time to put together the cable for the battery to the block. You should have a new terminal connector with your kit. With the thicker (4 gage) cable, add some di-electric grease and build the cable. You will have to strip off the sheathing from the ends of the cables. You can see it here.
Now take the other 4-gage cable and connect to the chassis so as to replace the original shoelace looking cable.
Time to ‘Fabricate’…Take II
Now that all the cables are in place you’re going to have to get the block installed.
First I’ll explain what I did, then I’ll tell you what else you can do if you like.
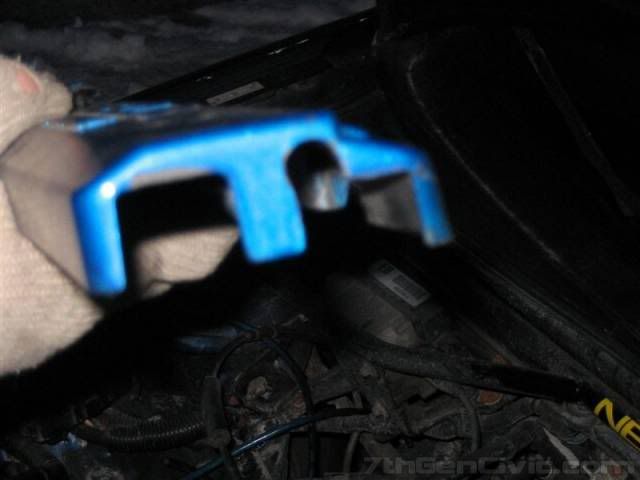
Take out the bracket from your OEM air intake system. This requires a little work. As you’ll notice the bracket has a raised lip on it, this should be grinded down if possible so that it’s smooth. This will make for a more flush fit with the block and give the screw a little added depth.
You’ll also want to drill a new hole for the screw. Take special care with this step. You don’t want to have the bracket covering the setscrews in any way at all.
Top angle…
Before you install the block into the car you should connect all your cables. Use proper judgment to determine which 8 gage cable reaches to what hole. Remember to use di-electric grease on the cable ends.
The 4 gage cables are installed on the sides of the block like this.
Once you have all the cables connected you can mount the block. Be careful to watch for tension on the cables while you do this, you don’t want them to get damaged.
Alternate idea for bracket: You could use the flat bracket that was supplied and mount it in the same area/location. It might offer you a little more clearance from the intake. I might switch to that but for now I like the one that I used despite the fabrication that was needed. You can see my block here with all the cables connected. I might have cut the sheathing a little much but that’s not going to wreck anything.
IMG]http://i7.photobucket.com/albums/y259/Pharoh/Wow/5779img_1244-med.jpg[/IMG]
Now that the block is in place and the cables are checked you can clean up and put everything back together.
Put the engine cover back on.
And the fun part…Put the Power Steering pump back on if you had to remove it.
IMPORTANT: Be very, very careful to do this properly. According to Honda, you are to fasten it from the top and then the bottom, then back to the top to add tension. Failure to do this properly will cause the pump to come loose and shred a belt like I did. The belt also sliced a lot of the wiring from my ABS in the process so be careful.
Finally…Re-connect the battery.
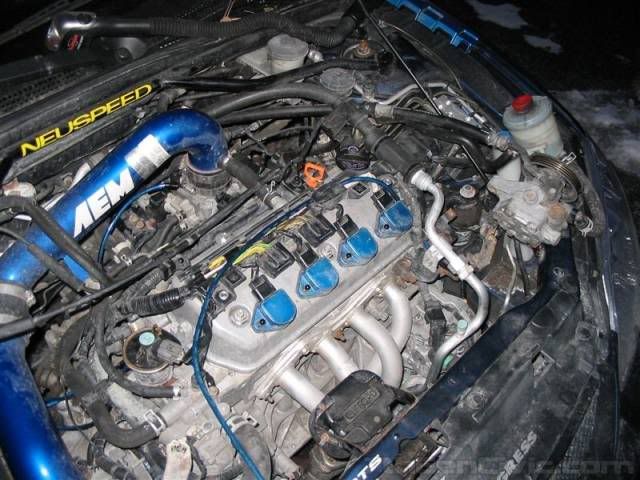
Do one more check around the engine. When you’re happy, start the car and DO NOT touch the accelerator for at least 30 seconds. You’ve had the battery disconnected so there’s no need to worry about resetting the ECU. Here’s the finished installation.
That should about cover the installation as would pertain to the 7th Generation Civic. I think this is pretty much the cleanest way to go about installing it. The wires aren’t really that visible except where they enter the block.
Review:
I’ve had the kit on my car since Sunday the 22nd of February. It’s been about 3 days and so far I’m quite happy with it.
Here are my findings thus far:
1) My favorite of all the improvements is the increased responsiveness in 2nd gear. The hesitation that was there is totally gone now.
2) The acceleration from a dead stop is improved.
3) The overall acceleration of the car is better.
4) My lights don’t dim or brighten with idle changes anymore. They stay the same.
5) Car idles a lot smoother.
I just filled up the car yesterday so I’m going to drive my regular routine this week and check out fuel consumption. I’ll update this when I have results.
I can’t say for certain about horsepower or torque since I couldn’t get the car tested ahead of the installation but I think the above should lend some idea as to what you can expect.
If you have any further questions about the kit you should direct them to bridge_msport (Chris) or myself. There is a thread where the kit is currently being discussed with Chris and other members in the marketplace forums. Link However, feel free to discuss it here. It will be linked into Other Parts and Products as well.
This thread was made to demonstrate the effects of my Bridge Motorsport Grounding kit on my 2001 Civic EX/Si and document the installation. I have several pictures that will show what I believe to be the ideal installation for this vehicle and detail each contact point by location. I’ll finish it up with my up to now review of this kit as well. This is my frist DIY
. Also, sorry for the dirty engine guys and gals but it is winter afterall..haha*Note: The block was mounted to the bracket used for the OEM air cleaner system. This bracket is available since it is not used for the Cold Air Intake that is shown here.*
This is the full kit. The main difference between this and what you receive is pretty basic.
1) The ‘L’ shaped bracket you see there is straight which will work better for the 7thgen anyway.
2) I think there’s more wire included, actually I’m pretty sure I got more than that. Mine are Blue so they match up with my gear.
Best thing to do is map out your setup. Check your cables and make sure you know which ones are going to go where. It’s not about the gage of the cable, it’s about the location and whether it will reach where you plan to put the block without being to tight.
You can leave the thicker of the cables out since it will be used as the new ground on your battery. Those stupid OEM shoelace ground wires are going to get tossed out. Haha.
My installation was setup to hide the wires as much as possible. In one location we actually used a lot less of one wire than was made available.
First it’s probably important to re-emphasize where the block is located so you can measure your cable lengths. It’s on the left of the picture where the OEM air cleaner used to be. There’s a bracket there that you can mount to. For now just recognize the location.
Now disconnect the battery and get started.
NOTE: It's a very good idea to use di-electric grease on all the connections.
First wire can go to the Valve cover. Remove the engine cover and attach the cable to the point shown here.
Next connect a wire to the upper thermostat housing like this.
Run one wire to the Throttle Body. As you can see the position is tight to the lower hose clamp on the intake. If this is the case for you as well you just have to slide it over a bit.
Ok. This is the part that sucks if you don’t have a lift or a way to get the car off the ground so you can get underneath….The Alternator. We had to go in from the top since we couldn’t get the car off the ground. This means that the Power Steering pump has to come out unless you have girlish arms and hands. Here’s the mess we made…hehe.
Once you have it out of the way you can get to the left side of the Alternator. There’s a housing bolt there that is perfect for another ground point. Note the way the cable is strung, this is important to how the cable is going to get run back to the block.
Now flip the plastic guard up that covers the wires for the coil packs (this can be kind of tricky).
Run the wire from the Alternator across there.
Once the cable is run across, snap the inside wire cover back in place checking not to pinch the cables. Note how the cable runs up next to the far right coil pack. Should look like this. You can leave this open until the lengths to the block are verified but closing it will keep the cables in place throughout the installation.
Time to ‘Fabricate’
You’ll need to use a dremmel tool or something that can grind the openings for the cables as they’ll need to be made a little bigger.
Here’s the left side of the cover with another opening notched out for the ground cable.
With the cover back in place you should be able to get the cable from the Alternator into the opening on the far right as shown below. Do not fasten it down yet. Wait until the end to make sure your cables are all going to reach. Just test the fit.
The left side of the cover should look like this once in place.
Time to put together the cable for the battery to the block. You should have a new terminal connector with your kit. With the thicker (4 gage) cable, add some di-electric grease and build the cable. You will have to strip off the sheathing from the ends of the cables. You can see it here.
Now take the other 4-gage cable and connect to the chassis so as to replace the original shoelace looking cable.
Time to ‘Fabricate’…Take II
Now that all the cables are in place you’re going to have to get the block installed.
First I’ll explain what I did, then I’ll tell you what else you can do if you like.
Take out the bracket from your OEM air intake system. This requires a little work. As you’ll notice the bracket has a raised lip on it, this should be grinded down if possible so that it’s smooth. This will make for a more flush fit with the block and give the screw a little added depth.
You’ll also want to drill a new hole for the screw. Take special care with this step. You don’t want to have the bracket covering the setscrews in any way at all.
Top angle…
Before you install the block into the car you should connect all your cables. Use proper judgment to determine which 8 gage cable reaches to what hole. Remember to use di-electric grease on the cable ends.
The 4 gage cables are installed on the sides of the block like this.
Once you have all the cables connected you can mount the block. Be careful to watch for tension on the cables while you do this, you don’t want them to get damaged.
Alternate idea for bracket: You could use the flat bracket that was supplied and mount it in the same area/location. It might offer you a little more clearance from the intake. I might switch to that but for now I like the one that I used despite the fabrication that was needed. You can see my block here with all the cables connected. I might have cut the sheathing a little much but that’s not going to wreck anything.
IMG]http://i7.photobucket.com/albums/y259/Pharoh/Wow/5779img_1244-med.jpg[/IMG]
Now that the block is in place and the cables are checked you can clean up and put everything back together.
Put the engine cover back on.
And the fun part…Put the Power Steering pump back on if you had to remove it.
IMPORTANT: Be very, very careful to do this properly. According to Honda, you are to fasten it from the top and then the bottom, then back to the top to add tension. Failure to do this properly will cause the pump to come loose and shred a belt like I did. The belt also sliced a lot of the wiring from my ABS in the process so be careful.
Finally…Re-connect the battery.
Do one more check around the engine. When you’re happy, start the car and DO NOT touch the accelerator for at least 30 seconds. You’ve had the battery disconnected so there’s no need to worry about resetting the ECU. Here’s the finished installation.
That should about cover the installation as would pertain to the 7th Generation Civic. I think this is pretty much the cleanest way to go about installing it. The wires aren’t really that visible except where they enter the block.
Review:
I’ve had the kit on my car since Sunday the 22nd of February. It’s been about 3 days and so far I’m quite happy with it.
Here are my findings thus far:
1) My favorite of all the improvements is the increased responsiveness in 2nd gear. The hesitation that was there is totally gone now.
2) The acceleration from a dead stop is improved.
3) The overall acceleration of the car is better.
4) My lights don’t dim or brighten with idle changes anymore. They stay the same.
5) Car idles a lot smoother.
I just filled up the car yesterday so I’m going to drive my regular routine this week and check out fuel consumption. I’ll update this when I have results.
I can’t say for certain about horsepower or torque since I couldn’t get the car tested ahead of the installation but I think the above should lend some idea as to what you can expect.
If you have any further questions about the kit you should direct them to bridge_msport (Chris) or myself. There is a thread where the kit is currently being discussed with Chris and other members in the marketplace forums. Link However, feel free to discuss it here. It will be linked into Other Parts and Products as well.
Last edited by Pharoh; 08-30-2009 at 04:29 PM.

 02-25-2004
#4
Life Begins > 6800rpms
Hey! Look At Me!! I'm a Supporting Member!!
iTrader: (14)
Join Date: Aug 2001
Location: Jacksonville, Fl
Age: 44
Posts: 7,097
Likes: 0
Received 0 Likes
on
0 Posts
Rep Power: 349 Nice DIY! I have the Arospeed Ground Kit and I installed mine the same way you have. I noticed minimal differences in idle and driveability but nothing to astounding. Heck, its prolly my brain telling me it's doing something.
02-25-2004
#5

Join Date: Jan 2004
Posts: 48
Likes: 0
Received 0 Likes
on
0 Posts
Rep Power: 0 

Awesome, awsome writeup dude.
I should mention that if you do no want to run the cable under the coil cover, there is enough cable provided to run behind the engine.
An alternate spot to hang the block, for the guys that haven't replaced the OEM intake, would be over on the strut tower using the bolt from an existing bracket.
And one last point. When you connect to the thermostat housing, you can see in the pic that there is a wire connected there already. This is the ECU ground. Use some sandpaper to clean one side of the factory connection and add your upgraded cable to the factory connection using the same bolt.
I should mention that I do offer kits for other cars as well.
Again, very cool writeup. I'm glad you are happy with the kit...
02-25-2004
#6
Join Date: Jan 2004
Posts: 48
Likes: 0
Received 0 Likes
on
0 Posts
Rep Power: 0 One thing about the Arospeed Kit: a painted central ground?
Makes no sense.
The factory points are also like this. I'm surprised you felt a difference to be honest.
Paint doesn't conduct too well...
Makes no sense.
The factory points are also like this. I'm surprised you felt a difference to be honest.
Paint doesn't conduct too well...
02-25-2004
#9
Registered!!
iTrader: (1)
Join Date: Jan 2002
Location: Htown, Tx
Age: 40
Posts: 333
Likes: 0
Received 0 Likes
on
0 Posts
Rep Power: 0 Really great write up...lots of good information in one place. I guess I'm sort of just asking a lot of people b/c I keep getting mixed responses, but has the kit made your low beam headlights any brighter, other than when the car's not idling?
02-25-2004
#10
Bobaganoosh!
Hey! Look At Me!! I'm a Supporting Member!!
Thread Starter
iTrader: (8)
Join Date: Apr 2002
Location: Poco, B.C. Canada
Age: 48
Posts: 26,704
Likes: 0
Received 0 Likes
on
0 Posts
Rep Power: 539 Originally posted by Htowncivic
Really great write up...lots of good information in one place. I guess I'm sort of just asking a lot of people b/c I keep getting mixed responses, but has the kit made your low beam headlights any brighter, other than when the car's not idling?
Really great write up...lots of good information in one place. I guess I'm sort of just asking a lot of people b/c I keep getting mixed responses, but has the kit made your low beam headlights any brighter, other than when the car's not idling?
02-25-2004
#11
Registered!!
iTrader: (1)
Join Date: Jan 2002
Location: Htown, Tx
Age: 40
Posts: 333
Likes: 0
Received 0 Likes
on
0 Posts
Rep Power: 0 Originally posted by Pharoh
hmmm..good question. I have TYC projectors and I always find the lows bright. I'll check that for you tonight though.
hmmm..good question. I have TYC projectors and I always find the lows bright. I'll check that for you tonight though.
02-26-2004
#16
Bobaganoosh!
Hey! Look At Me!! I'm a Supporting Member!!
Thread Starter
iTrader: (8)
Join Date: Apr 2002
Location: Poco, B.C. Canada
Age: 48
Posts: 26,704
Likes: 0
Received 0 Likes
on
0 Posts
Rep Power: 539 Originally posted by Htowncivic
has the kit made your low beam headlights any brighter, other than when the car's not idling?
has the kit made your low beam headlights any brighter, other than when the car's not idling?
02-26-2004
#18
Bobaganoosh!
Hey! Look At Me!! I'm a Supporting Member!!
Thread Starter
iTrader: (8)
Join Date: Apr 2002
Location: Poco, B.C. Canada
Age: 48
Posts: 26,704
Likes: 0
Received 0 Likes
on
0 Posts
Rep Power: 539 Originally posted by Htowncivic
hmmm...thanks for the info, do u have oem headlights or do you have some sort of modification, lightbulbs, something?
hmmm...thanks for the info, do u have oem headlights or do you have some sort of modification, lightbulbs, something?
02-26-2004
#20
Bobaganoosh!
Hey! Look At Me!! I'm a Supporting Member!!
Thread Starter
iTrader: (8)
Join Date: Apr 2002
Location: Poco, B.C. Canada
Age: 48
Posts: 26,704
Likes: 0
Received 0 Likes
on
0 Posts
Rep Power: 539 Originally posted by halocivic
where and how much is this thing?
where and how much is this thing?
02-26-2004
#22
Bobaganoosh!
Hey! Look At Me!! I'm a Supporting Member!!
Thread Starter
iTrader: (8)
Join Date: Apr 2002
Location: Poco, B.C. Canada
Age: 48
Posts: 26,704
Likes: 0
Received 0 Likes
on
0 Posts
Rep Power: 539 Originally posted by YS
so .... for the ground pint
1. Valve Cover
2. Thermostat housing
3. Throttle Body
4. Alternator
5. Tranny
am i right??
so .... for the ground pint
1. Valve Cover
2. Thermostat housing
3. Throttle Body
4. Alternator
5. Tranny
am i right??
02-29-2004
#24
Bobaganoosh!
Hey! Look At Me!! I'm a Supporting Member!!
Thread Starter
iTrader: (8)
Join Date: Apr 2002
Location: Poco, B.C. Canada
Age: 48
Posts: 26,704
Likes: 0
Received 0 Likes
on
0 Posts
Rep Power: 539 Originally posted by YS
thank you kindly Pharoh
thank you kindly Pharoh
Well, it's been one week now with this kit installed. I took the car for small trip yesterday and gave it hell all the way there and back. I can really feel a difference in the acceleration, alot smoother now.
Gas mileage seems a little better but my driving was was inconsistant compared to the usual.
02-29-2004
#25
iTrader: (8)
Join Date: Oct 2002
Location: Colorado USA
Posts: 6,730
Likes: 0
Received 0 Likes
on
0 Posts
Rep Power: 329 Plus its winter, u cant really measure as milege accuratly in this weather,
I should get me one of these things, will it stop my lights dimming when the bass hits ?
I should get me one of these things, will it stop my lights dimming when the bass hits ?
03-09-2004
#26
Premium Member
Hey! Look At Me!! I'm a Supporting Member!!
iTrader: (95)

Join Date: Sep 2002
Location: NV
Age: 43
Posts: 51,241
Likes: 0
Received 18 Likes
on
13 Posts
Rep Power: 787 I redid my ground wires by upgrading the stock chassis ground. I also ran three wires from the battery to tranny, thermostat, and valve cover. The only things I noticed were smoother auto tranny and idle, plus cleaner stereo. Those alone make it worthwhile. Also, I didn't ground the alternator, so maybe that would help some more.
03-10-2004
#29
Bobaganoosh!
Hey! Look At Me!! I'm a Supporting Member!!
Thread Starter
iTrader: (8)
Join Date: Apr 2002
Location: Poco, B.C. Canada
Age: 48
Posts: 26,704
Likes: 0
Received 0 Likes
on
0 Posts
Rep Power: 539 Originally posted by gearbox
I redid my ground wires by upgrading the stock chassis ground. I also ran three wires from the battery to tranny, thermostat, and valve cover. The only things I noticed were smoother auto tranny and idle, plus cleaner stereo. Those alone make it worthwhile. Also, I didn't ground the alternator, so maybe that would help some more.
I redid my ground wires by upgrading the stock chassis ground. I also ran three wires from the battery to tranny, thermostat, and valve cover. The only things I noticed were smoother auto tranny and idle, plus cleaner stereo. Those alone make it worthwhile. Also, I didn't ground the alternator, so maybe that would help some more.
obguam: you won't regret it.
 03-10-2004
#30
Premium Member
Hey! Look At Me!! I'm a Supporting Member!!
iTrader: (95)
Join Date: Sep 2002
Location: NV
Age: 43
Posts: 51,241
Likes: 0
Received 18 Likes
on
13 Posts
Rep Power: 787 I'm also getting the hyper voltage system today, so hopefully it helps more.
Don't expect huge gains with the grounding kit. The only things you can really feel is the smoother tranny and idle. Even if it gained hp, you can't really feel a few hp difference anyway. But this is probably the best kit you'll find anywhere.
Don't expect huge gains with the grounding kit. The only things you can really feel is the smoother tranny and idle. Even if it gained hp, you can't really feel a few hp difference anyway. But this is probably the best kit you'll find anywhere.

