DIY Alternator High Output Upgrade
 11-04-2006
#1
Registered!!
Thread Starter
Join Date: Jan 2006
Age: 36
Posts: 214
Likes: 0
Received 0 Likes
on
0 Posts
Rep Power: 0 
DIY Alternator High Output Upgrade
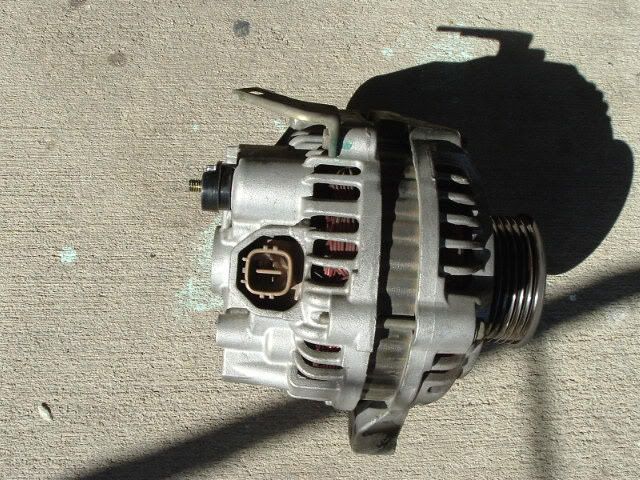
Hey everyone, my new alternator from Alterstart just arrived last night!
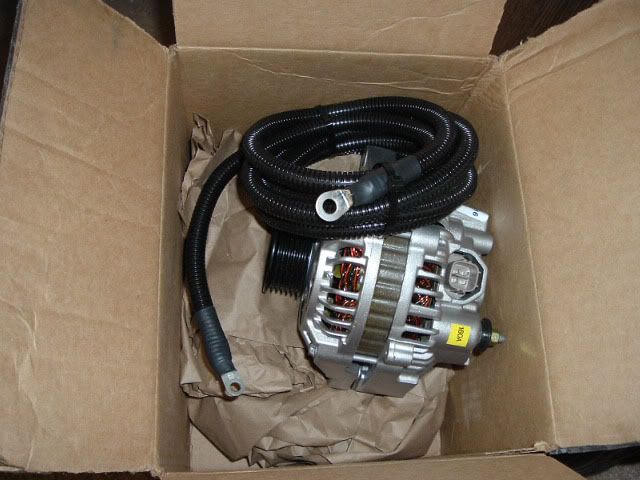
Thank you UPS man!
^Behold! This is a 160Amp high output alternator (& 4 gauge wire harness) that will be replacing the wimpy 70Amp factory in my 01' Civic LX coupe. I am very satisfied with the install; lights stopped dimming and stereo system has had a significant difference! Overall experience with "Alterstart" is neutral. Their alternators are great, but customer service is somewhat not - very rude and arrogant "professionals". On the bright side, their prices are considerably exceptional. The overall cost turned out to be $286 (including sales tax, shipping, and 8ft heavy gauge upgrade wire).
Enough with the boring stuff - now to the procedures that everyone's been waiting for:
Materials:
Socket wrench set
ratchet set (very handy in tight spaces)
electrical tape
wire ties
new alternator (of course)
heavy gauge wire (very important! DO NOT use the factory wire as it is not able to withstand the increase of amperage)
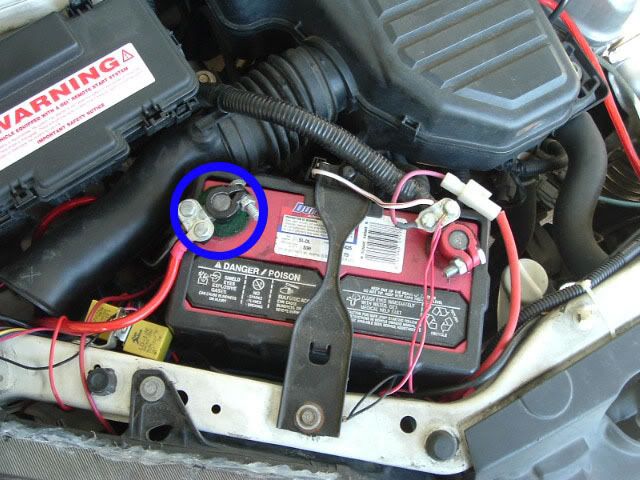
Step 1
Remove negative terminal cable from battery (blue)
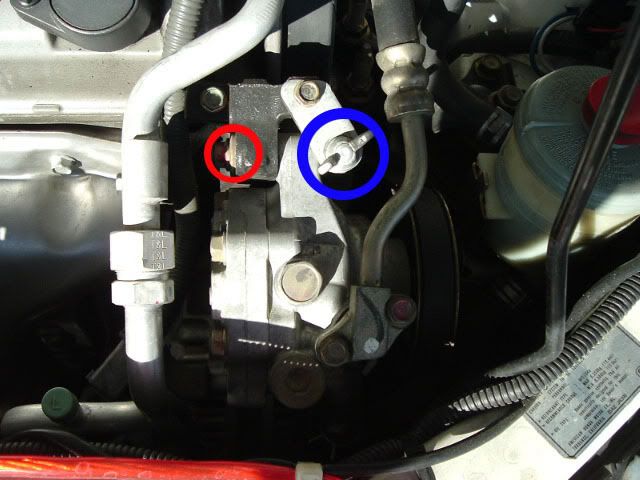
Step 2
Locate power steering pump
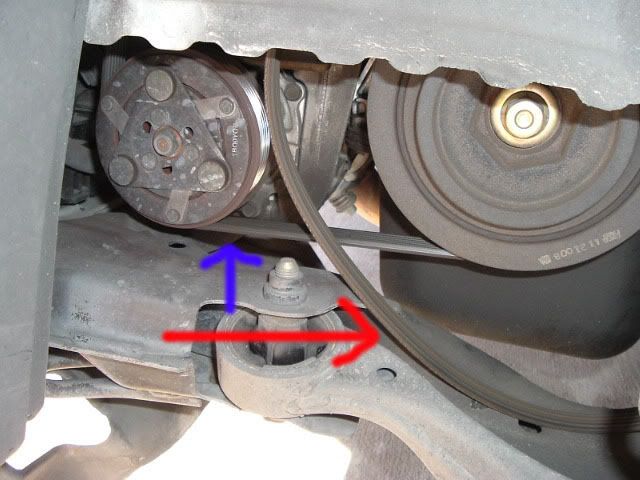
Red: loosen the upper mounting bolt (pictured) & lower mounting bolt (not picture - located near power steering pulley).
Blue: Once the two mounting bolts are loose, turn the adjustment nut counter-clockwise to loosen up the power steering belt. Take off belt once it is loosen to the point where it can be taken off without excessive force.
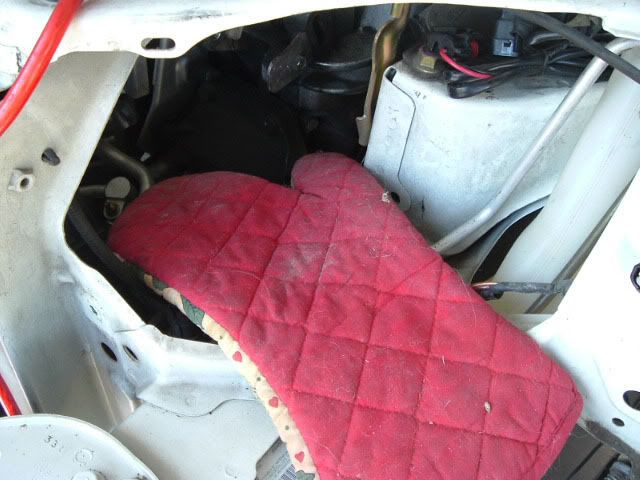
Step 3
After taking off belt, completely remove upper and lower mounting bolts. Put power steering unit aside (do not remove any hose). Oven mitten was used to protect paint.

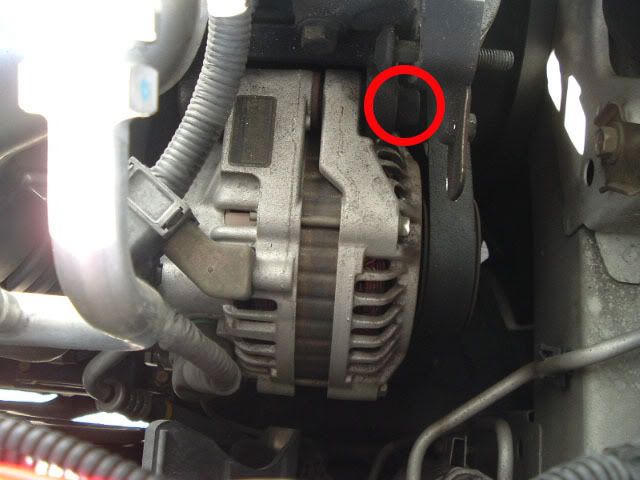
Step 4
Now that the power steering unit is out of the way, the alternator should be a breeze to get out. I learned later that it was not and had to take out bumper and driver's side headlight in order to get it out.
Edit: Just remove the two upper and lower powersteering brackets (little piece of metal with 10mm bolt), power steering reservoir bracket (12mm bolt) and the alternator should slide out freely w/o removing headlight and bumper.
Red: Loosen alternator upper mounting bolt (pictured)
Step 5
slightly loosen up driver's front side wheel lugs, jack up front driver's side and place on a jack stand
Step 6
Take off lug nuts and wheel.
Red: See that splash shield? Remove the red plastic tapping screws and pull it out of the way
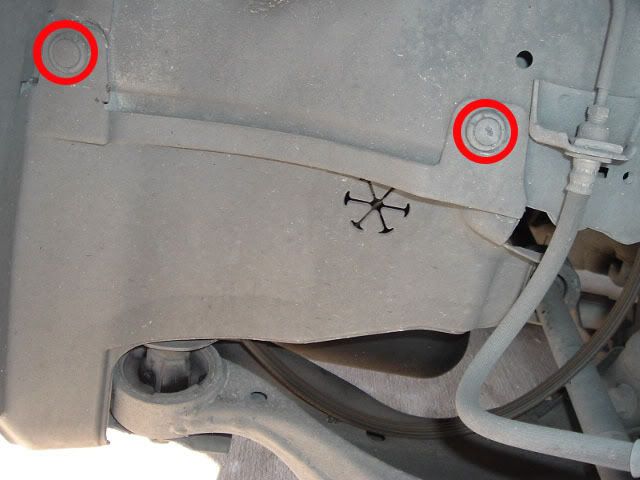

Step 7
Red: Power steering belt that was taken off of power steering pump earlier
blue: Next on your hit list. This is the alternator & AC belt
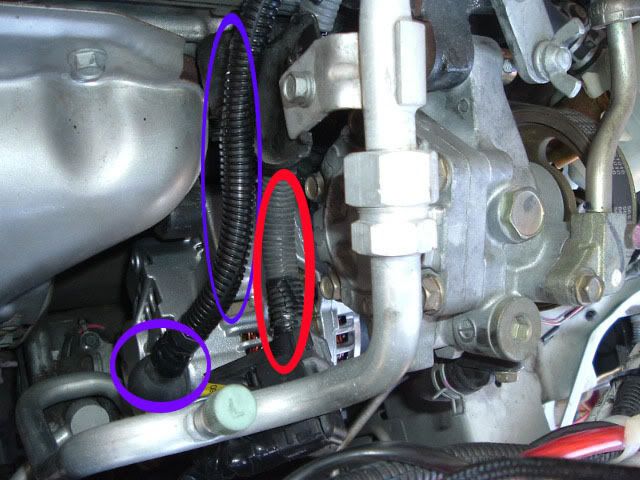
Step 8
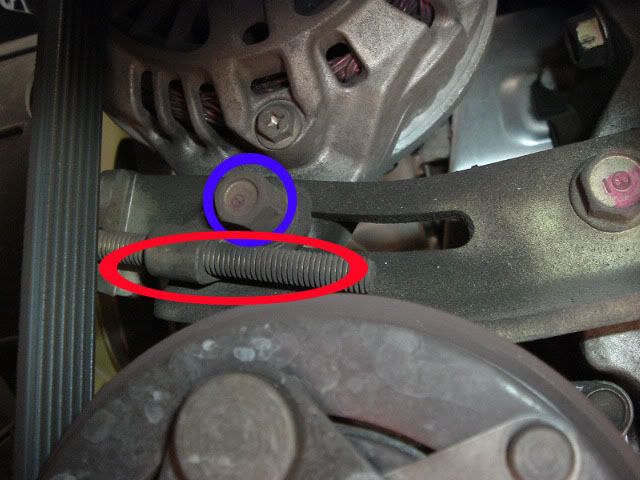
Blue: loosen lower alternator mounting bolt
Red: look at this screw - it is the belt adjusting screw (picture from another angle in next step)
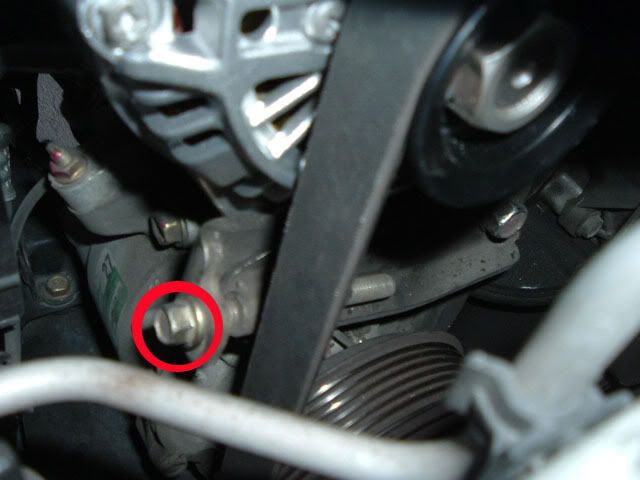
Step 9
Red: This is the belt adjusting bolt in step 8. Turn this bad boy counter-clockwise until the belt begins to loosen and can be removed.
Step 10
Red: This is the positive output cable that will be upgraded with a 4 gauge harness. Remove it with a 10mm socket.
Blue: This is the electric plug, just simply squeeze the release button and pull it out.

Step 11
You can now remove the upper and lower mounting bolts of the alternator.
Pictured below is when I had a problem trying to get it out and it eventually led me to take off bumper and driver's headlight. Installation of new alternator was very easy with the headlight out because it created a lot of space to take the alternator out through the headlight frame.

LAUGH AT THE 70AMP POS OEM ALTERNATOR
COMPARE THE TWO ALTERNATORS
Do they look of the same size? Does it look like the new alternator will fit fine? Notice the new high output alternator (RIGHT SIDE) has a smaller pulley. It's supposed to increase the amount of revolutions.

Step 12
Blue: cut off the rubber insultating boot from the OEM output cable to reuse on the new 4 gauge wire. Be sure to wrap LOTS of electric tape around any conducting area of the OEM wire and place it aside. OEM wire will be zipped tied to something later. You can remove the OEM output wire if you want, but I prefer to leave it because I'm lazy and I can put back the OEM alternator to use as a spare in the event (God forbids) the high output alternator fails.

Step 13
Install rubber boot on new 4 gauge wire

Step 14
Now installation is the opposite of removal - be sure to install the alternator and power steering belts on tightly (give .25 in of belt deflection). I placed another handy oven mitten in the headlight frame to protect the AC lines.
Step 15
Blue: New 4 gauge wire
Red: old OEM wire - zip tip this to the 4 gauge wire or any non-moving surface in case you need it later.
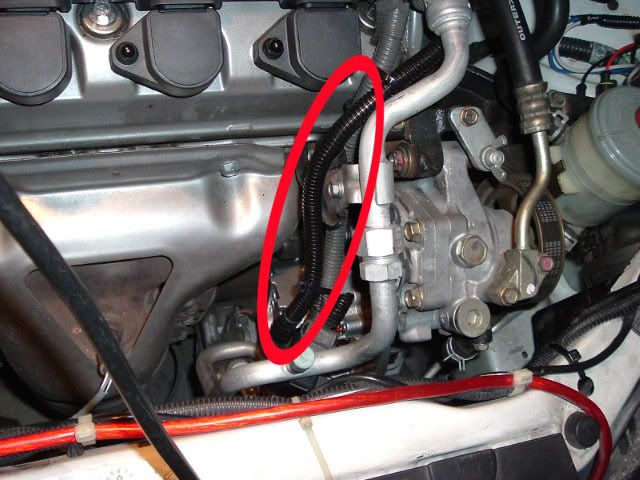
Step 16
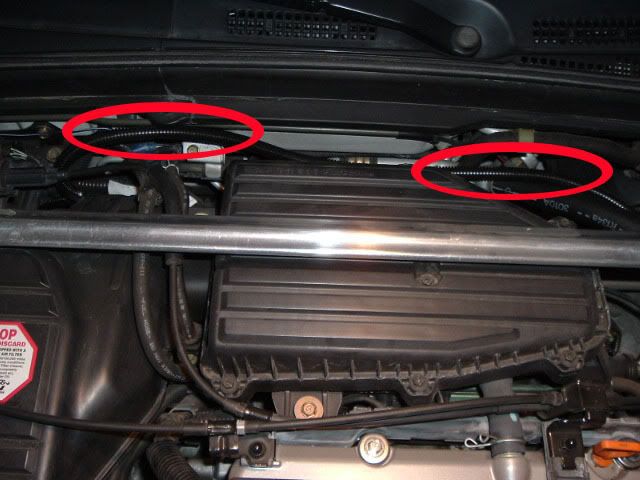
The next pictures just shows how I routed the 4 gauge wire. There is no right or wrong way to route this wire, just as long as it ends up at the positive battery terminal and doesn't obstruct any moving object in the engine bay. Again, use the zip ties!

Step 17
You are now practically done. Connect the negative cable to your battery, put your wheels back on and you are ready to rock and roll!
Step 18
The haynes manual suggests to put the car in 3000 RPMs (with no load i.e. parking lights, stereo sytem) immediately when the vehicle is started to initialize the PCM (powertrain control module) idle learn procedure. This is mandatory every time the battery is disconnected. Caution: if you are parked in a garage like me, push the car out into the driveway and do this to avoid carbon monoxide poisoning. You can bring it back down to normal idle when you hear the radiator fan kicking in or the temperature gauge is at normal operating temperature.
Now sit back, have a beer and enjoy the fruits of your labor
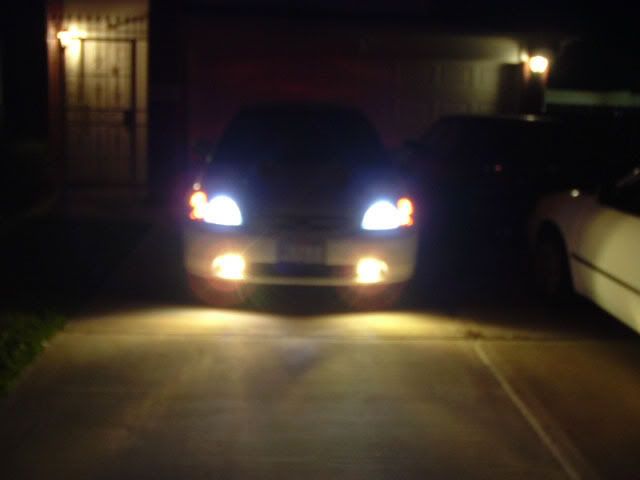
FULL POWER BABY!!!! No more dimming lights!!!!
Overall, this procedure took me 2.5 hours. Class was dismissed early this morning so I went home to work on it right away, then I had go to work @ noon, got back home @ 5:00PM and finished it up. Happy modding
Thank you UPS man!
^Behold! This is a 160Amp high output alternator (& 4 gauge wire harness) that will be replacing the wimpy 70Amp factory in my 01' Civic LX coupe. I am very satisfied with the install; lights stopped dimming and stereo system has had a significant difference! Overall experience with "Alterstart" is neutral. Their alternators are great, but customer service is somewhat not - very rude and arrogant "professionals". On the bright side, their prices are considerably exceptional. The overall cost turned out to be $286 (including sales tax, shipping, and 8ft heavy gauge upgrade wire).
Enough with the boring stuff - now to the procedures that everyone's been waiting for:
Materials:
Socket wrench set
ratchet set (very handy in tight spaces)
electrical tape
wire ties
new alternator (of course)
heavy gauge wire (very important! DO NOT use the factory wire as it is not able to withstand the increase of amperage)
Step 1
Remove negative terminal cable from battery (blue)
Step 2
Locate power steering pump
Red: loosen the upper mounting bolt (pictured) & lower mounting bolt (not picture - located near power steering pulley).
Blue: Once the two mounting bolts are loose, turn the adjustment nut counter-clockwise to loosen up the power steering belt. Take off belt once it is loosen to the point where it can be taken off without excessive force.
Step 3
After taking off belt, completely remove upper and lower mounting bolts. Put power steering unit aside (do not remove any hose). Oven mitten was used to protect paint.
Step 4
Now that the power steering unit is out of the way, the alternator should be a breeze to get out. I learned later that it was not and had to take out bumper and driver's side headlight in order to get it out.
Edit: Just remove the two upper and lower powersteering brackets (little piece of metal with 10mm bolt), power steering reservoir bracket (12mm bolt) and the alternator should slide out freely w/o removing headlight and bumper.
Red: Loosen alternator upper mounting bolt (pictured)
Step 5
slightly loosen up driver's front side wheel lugs, jack up front driver's side and place on a jack stand
Step 6
Take off lug nuts and wheel.
Red: See that splash shield? Remove the red plastic tapping screws and pull it out of the way
Step 7
Red: Power steering belt that was taken off of power steering pump earlier
blue: Next on your hit list. This is the alternator & AC belt
Step 8
Blue: loosen lower alternator mounting bolt
Red: look at this screw - it is the belt adjusting screw (picture from another angle in next step)
Step 9
Red: This is the belt adjusting bolt in step 8. Turn this bad boy counter-clockwise until the belt begins to loosen and can be removed.
Step 10
Red: This is the positive output cable that will be upgraded with a 4 gauge harness. Remove it with a 10mm socket.
Blue: This is the electric plug, just simply squeeze the release button and pull it out.
Step 11
You can now remove the upper and lower mounting bolts of the alternator.
Pictured below is when I had a problem trying to get it out and it eventually led me to take off bumper and driver's headlight. Installation of new alternator was very easy with the headlight out because it created a lot of space to take the alternator out through the headlight frame.
LAUGH AT THE 70AMP POS OEM ALTERNATOR
COMPARE THE TWO ALTERNATORS
Do they look of the same size? Does it look like the new alternator will fit fine? Notice the new high output alternator (RIGHT SIDE) has a smaller pulley. It's supposed to increase the amount of revolutions.
Step 12
Blue: cut off the rubber insultating boot from the OEM output cable to reuse on the new 4 gauge wire. Be sure to wrap LOTS of electric tape around any conducting area of the OEM wire and place it aside. OEM wire will be zipped tied to something later. You can remove the OEM output wire if you want, but I prefer to leave it because I'm lazy and I can put back the OEM alternator to use as a spare in the event (God forbids) the high output alternator fails.
Step 13
Install rubber boot on new 4 gauge wire
Step 14
Now installation is the opposite of removal - be sure to install the alternator and power steering belts on tightly (give .25 in of belt deflection). I placed another handy oven mitten
Step 15
Blue: New 4 gauge wire
Red: old OEM wire - zip tip this to the 4 gauge wire or any non-moving surface in case you need it later.
Step 16
The next pictures just shows how I routed the 4 gauge wire. There is no right or wrong way to route this wire, just as long as it ends up at the positive battery terminal and doesn't obstruct any moving object in the engine bay. Again, use the zip ties!
Step 17
You are now practically done. Connect the negative cable to your battery, put your wheels back on and you are ready to rock and roll!
Step 18
The haynes manual suggests to put the car in 3000 RPMs (with no load i.e. parking lights, stereo sytem) immediately when the vehicle is started to initialize the PCM (powertrain control module) idle learn procedure. This is mandatory every time the battery is disconnected. Caution: if you are parked in a garage like me, push the car out into the driveway and do this to avoid carbon monoxide poisoning. You can bring it back down to normal idle when you hear the radiator fan kicking in or the temperature gauge is at normal operating temperature.
Now sit back, have a beer and enjoy the fruits of your labor
FULL POWER BABY!!!! No more dimming lights!!!!
Overall, this procedure took me 2.5 hours. Class was dismissed early this morning so I went home to work on it right away, then I had go to work @ noon, got back home @ 5:00PM and finished it up. Happy modding
 11-04-2006
#4
Registered!!
Thread Starter
Join Date: Jan 2006
Age: 36
Posts: 214
Likes: 0
Received 0 Likes
on
0 Posts
Rep Power: 0 Big 3 is always a must! Thanks for the reminder. Be sure to upgrade your grounds each to a 4 gauge (or heavier) wire as well folks!
11-04-2006
#5
Registered!!
Thread Starter
Join Date: Jan 2006
Age: 36
Posts: 214
Likes: 0
Received 0 Likes
on
0 Posts
Rep Power: 0 Dammit!!! The battery light is now on  But the weird thing is it turns off after I rev the engine to 4000 RPMs and comes back on when RPMs are lower than 4000. I parked the car into the garage for now and used my dad's car to go to the gf's house to spend the night. Will come back home tomorrow to see what's going on. I think I put the belt on a little too tight. I'll relieve some tension tomorrow to see if it would stop. Normal belt deflection is about .5 inches right? Has anyone ever had this problem before?
But the weird thing is it turns off after I rev the engine to 4000 RPMs and comes back on when RPMs are lower than 4000. I parked the car into the garage for now and used my dad's car to go to the gf's house to spend the night. Will come back home tomorrow to see what's going on. I think I put the belt on a little too tight. I'll relieve some tension tomorrow to see if it would stop. Normal belt deflection is about .5 inches right? Has anyone ever had this problem before?
11-05-2006
#6
Registered!!
Thread Starter
Join Date: Jan 2006
Age: 36
Posts: 214
Likes: 0
Received 0 Likes
on
0 Posts
Rep Power: 0 How disappointing!!!!! All along I was praising this HO alternator when it turned out to be a dud! My simple diagnostics - hooked up a multimeter to the battery terminals with the engine on and the voltage fluctuates from 12.5 - 13 and then down to 12 volts. I now understand why the battery light kept on randomly turning on and off.
My final decision in desperation: Re-install the stock alternator. Everything is now back to normal, no battery light whatsoever. I'm so going to call in and bitch to alterstart about this!
In spite of all this, I can now change an alternator in less than an hour
My final decision in desperation: Re-install the stock alternator. Everything is now back to normal, no battery light whatsoever. I'm so going to call in and bitch to alterstart about this!
In spite of all this, I can now change an alternator in less than an hour
11-05-2006
#8
Yes, it's an Acura EL
iTrader: (23)
Join Date: Dec 2002
Location: 416-905, Ontario, Canada
Age: 46
Posts: 8,248
Likes: 0
Received 0 Likes
on
0 Posts
Rep Power: 343 
Sorry to hear it didn't work out, much too bad but maybe you can look at the alternator MegaHurtz put out some time ago.
I've removed and reinstalled my alt twice (botched engine mount bracket install) and replaced my buddy's DX coupe's as well, and I never had to remove the headlight or bumper. In fact, the car involved stayed on the ground all 3 times I've worked with the alt. It would probably have made things a little easier but really if you have small dainty asian hands like myself you can do all your pushing, pulling, swearing and finagling from the top of the engine bay once the PS pump hardware is removed.
One last note - I was going to buy an Alterstart unit some years ago and on my inquiry they told me that their alternators were built for the Civic coupe (EM2's are US-made) and would not fit the sedans (ES1's are Canadian-made), something to do with bracket placement or something. I believed them and passed on the info to everybody. However one of my friends recently replaced his alternator, he has a sedan and used the one from a coupe. Just a little added info, hope I didn't hijack too badly.
11-05-2006
#9
Registered!!
Thread Starter
Join Date: Jan 2006
Age: 36
Posts: 214
Likes: 0
Received 0 Likes
on
0 Posts
Rep Power: 0 Sorry to hear it didn't work out, much too bad but maybe you can look at the alternator MegaHurtz put out some time ago.
I've removed and reinstalled my alt twice (botched engine mount bracket install) and replaced my buddy's DX coupe's as well, and I never had to remove the headlight or bumper. In fact, the car involved stayed on the ground all 3 times I've worked with the alt. It would probably have made things a little easier but really if you have small dainty asian hands like myself you can do all your pushing, pulling, swearing and finagling from the top of the engine bay once the PS pump hardware is removed.
One last note - I was going to buy an Alterstart unit some years ago and on my inquiry they told me that their alternators were built for the Civic coupe (EM2's are US-made) and would not fit the sedans (ES1's are Canadian-made), something to do with bracket placement or something. I believed them and passed on the info to everybody. However one of my friends recently replaced his alternator, he has a sedan and used the one from a coupe. Just a little added info, hope I didn't hijack too badly.
It's a good thing the alterstart came with a 2 year warrantee. I'll send it back immediately tomorrow and see what they have to say about this.
11-05-2006
#11
The only Wyoming Redneck on here
Join Date: Jul 2006
Location: Wyoming
Posts: 501
Likes: 0
Received 0 Likes
on
0 Posts
Rep Power: 222 ever since i installed my system (800w) when the bass hits the lights dim and it pisses me off.how much did this cost? and where do you get an alterstart alt? thanks
11-05-2006
#12
Yes, it's an Acura EL
iTrader: (23)
Join Date: Dec 2002
Location: 416-905, Ontario, Canada
Age: 46
Posts: 8,248
Likes: 0
Received 0 Likes
on
0 Posts
Rep Power: 343 ^^Before you go blowing $400-$500 on a new alternator, go to your local stereo shop and spend $50 on some 2 or 0 gauge wiring and terminal rings so you can upgrade your engine bay wiring. Upgrade the big 3 (search for the DIY) and that should help significantly. If after all that you're still dimming too much then check this page:
http://www.4alterstart.com/
BTW I'm running a huge sub and amp combo plus a carputer and I don't dim unless it's so loud the speakers clip. I upgraded the big 3 wiring and added a D34 Optima Yellow, no caps no alt.
http://www.4alterstart.com/
BTW I'm running a huge sub and amp combo plus a carputer and I don't dim unless it's so loud the speakers clip. I upgraded the big 3 wiring and added a D34 Optima Yellow, no caps no alt.
11-09-2006
#13
The World Is Yours!
iTrader: (4)
Join Date: Jul 2003
Location: behind my D80
Age: 38
Posts: 2,617
Likes: 0
Received 0 Likes
on
0 Posts
Rep Power: 301 well i got a Ohio Alt. and i had to i guess install the 4ga. harness with it. it was battery charge light came one, then i decided to take off, and i didnt do anything else, but i want to change the harness. if the light still flickers, maybe it is the alt. but i think this should be be fine after the wiring is fixxed.
~shouldnt you upgrade the wire going from the battery to the fuse box to a 4 ga. too?!
~shouldnt you upgrade the wire going from the battery to the fuse box to a 4 ga. too?!
11-10-2006
#14
Registered!!
Thread Starter
Join Date: Jan 2006
Age: 36
Posts: 214
Likes: 0
Received 0 Likes
on
0 Posts
Rep Power: 0 Nope - just hook up the 4 gauge wire DIRECTLY to the battery. Alterstart just sent me a new alternator in exchange for the damaged one yesterday. Maybe it's just my luck, but things keep screwing up this week. They sent me a 150A instead of a 160A!!! How big of a difference does the 10A make? Anyway, I installed it last night, took a test drive, and the battery light flickers (turns on for a millisecond and then off) once in a while. Argghhh.... it probably isn't a good thing to over-tighten the belt, but I'll give it a try tonight to see if that battery light would stop flickering.
burk420 - let me know how your install turned out
burk420 - let me know how your install turned out
11-10-2006
#15
Registered!!
iTrader: (3)
Join Date: Aug 2002
Posts: 863
Likes: 0
Received 0 Likes
on
0 Posts
Rep Power: 0 Honda inspired, I'd do a search on here and read up on the aem underdrive pulleys I think they said something about having the smaller pulley on the alternator makes you have less amps. Not positive on that but read up on it and it may give you some info.
You might even try putting the stock puller on the Alterstart alternator that may fix your problem.
You might even try putting the stock puller on the Alterstart alternator that may fix your problem.
11-10-2006
#16
Registered!!
Thread Starter
Join Date: Jan 2006
Age: 36
Posts: 214
Likes: 0
Received 0 Likes
on
0 Posts
Rep Power: 0 Hey guys and gals! This morning, after I was released from my govt. class, I rushed home to call Alterstart about the problem and they said it may be a possibility that the brushings need time to "break-in." I then went out and tightened the belt to a .25" deflection (was @ .5") and it seemed to have improved. The battery warning light has only blinked 3 or 4 times during the entire 30 mile trip from home to work. The duration of the "blink" is less than a second. Everything seems to be fine as I have made it to work in one piece and bumping my stereo on loud in the company parking lot. My prognosis - a healthy organ transplant that needs some further evaluation. Will keep ya'll posted.
-Lewis
-Lewis
11-10-2006
#18
Registered!!
Thread Starter
Join Date: Jan 2006
Age: 36
Posts: 214
Likes: 0
Received 0 Likes
on
0 Posts
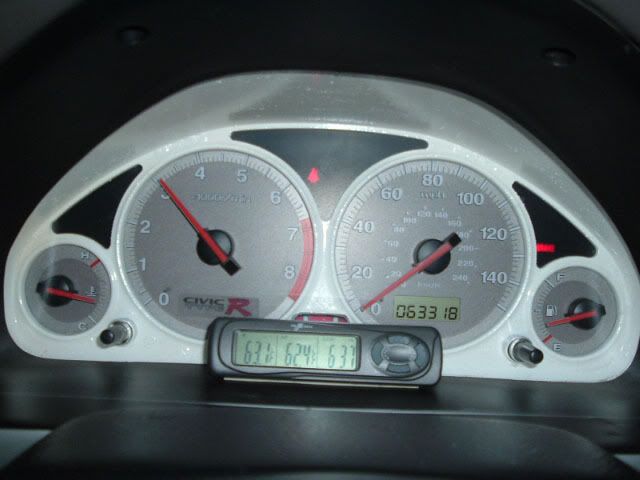
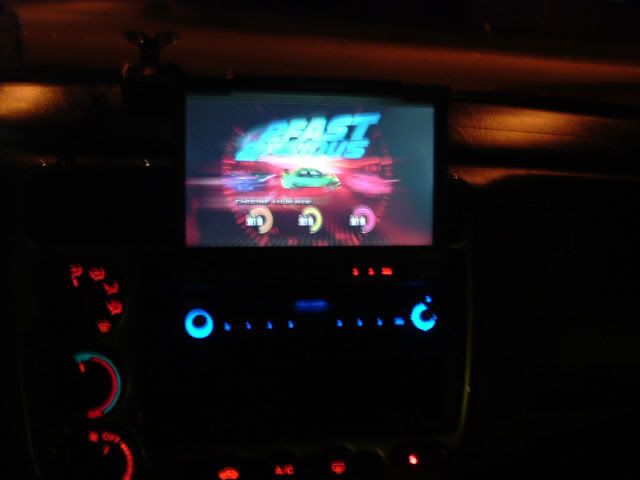
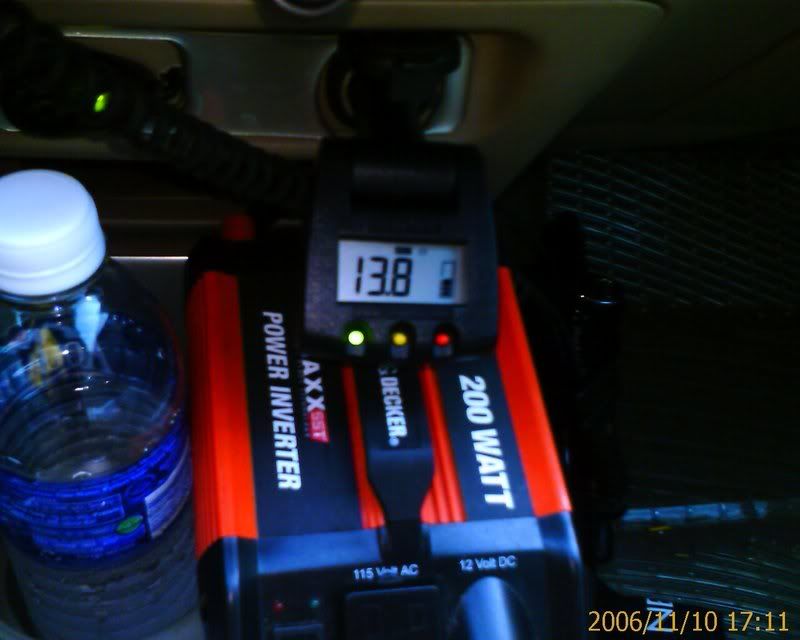
Rep Power: 0 Hello again guys and dolls! I just got home from work, stopped by wal-mart and got myself this bad boy for $15 bucks:

^it's a voltmeter that simply plugs into your cigarette lighter - a great alternative to the 52mm voltmeters in which you have to install into a guage pod.
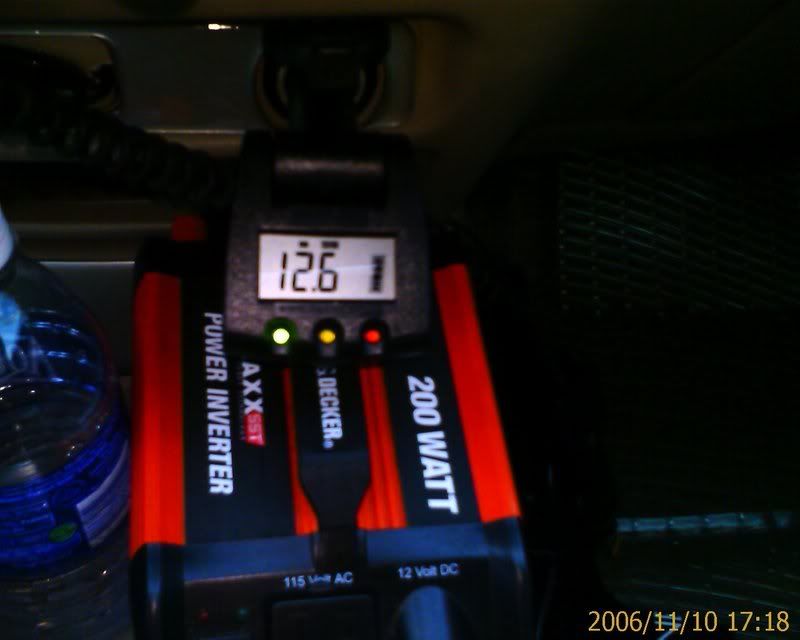
This voltmeter convinced me that there wasn't anything wrong with my alternator. It's just the voltage regulator in my alternator that isn't in sync with my charging system (no big deal - just annoying flick of battery light once in a while). After observing the voltage changes on the voltmeter, I noticed at the point when the battery warning light starts to flicker (for a millisecond), the voltage dropped down to 12.5 volts! This is odd considering the normal voltage is SUPPOSED to be 13.5 when the car's engine is on. But since this is a high output alternator, it rapidly charges the battery full and the voltage regulator kicks in and limits current flowing into the battery so it doesn't overcharge (thus the brief flash of the battery light). So after the voltage regulator kicks in and makes the battery light flash once and turn off, the volts drop down to between 12.5 - 13.0 volts until more load is on demand. Once I turned on my A/C & stereo all the way up, voltage regulator sees this (doesn't flash light this time) and bumps up the voltage from 12.5 volts to a healthy 13.8 volts! Long story short, my efforts in installing a HO alternator wasn't wasted at all
Engine on:
Engine off:
I highly recommend this voltmeter if you actually care about your electrical system - it's a must have! I even sacraficed the plug in which I use to power my radar detector and put this voltmeter in its place.
I'm one happy camper for now
Let's see in the longterm how this high output alternator treats me.
^it's a voltmeter that simply plugs into your cigarette lighter - a great alternative to the 52mm voltmeters in which you have to install into a guage pod.
This voltmeter convinced me that there wasn't anything wrong with my alternator. It's just the voltage regulator in my alternator that isn't in sync with my charging system (no big deal - just annoying flick of battery light once in a while). After observing the voltage changes on the voltmeter, I noticed at the point when the battery warning light starts to flicker (for a millisecond), the voltage dropped down to 12.5 volts! This is odd considering the normal voltage is SUPPOSED to be 13.5 when the car's engine is on. But since this is a high output alternator, it rapidly charges the battery full and the voltage regulator kicks in and limits current flowing into the battery so it doesn't overcharge (thus the brief flash of the battery light). So after the voltage regulator kicks in and makes the battery light flash once and turn off, the volts drop down to between 12.5 - 13.0 volts until more load is on demand. Once I turned on my A/C & stereo all the way up, voltage regulator sees this (doesn't flash light this time) and bumps up the voltage from 12.5 volts to a healthy 13.8 volts! Long story short, my efforts in installing a HO alternator wasn't wasted at all
Engine on:
Engine off:
I highly recommend this voltmeter if you actually care about your electrical system - it's a must have! I even sacraficed the plug in which I use to power my radar detector and put this voltmeter in its place.
I'm one happy camper for now
Let's see in the longterm how this high output alternator treats me.
11-11-2006
#19
The World Is Yours!
iTrader: (4)
Join Date: Jul 2003
Location: behind my D80
Age: 38
Posts: 2,617
Likes: 0
Received 0 Likes
on
0 Posts
Rep Power: 301 nice addition... i am prolly gonna install my alternator tonight, or tomorrow. i got the matertials...just procrastinating right now! hehe but i heard a impala at my local sound shop i talk to, and they installed...2-13W7s with 2-1000 JL amps, one for each sub, a 450/4-mids,highs, TV, light a 200 amp alternator, and they said to ground the alternator to the battery... so ill add this to my install..just lending you any info i recieved.


Thread
Thread Starter
Honda Civic Forum
Replies
Last Post
mistermenphis22
Mechanical Problems/Vehicle Issues and Fix-it Forum
13
07-13-2015 04:43 PM
Touge
Canada East
0
06-18-2015 11:44 PM

