DIY Change your ignition switch light color. PROGRESS PICS ADDED!!!
 06-18-2010
#1
Administrator
Hey! Look At Me!! I'm a Supporting Member!!
Administrator
Thread Starter
iTrader: (22)
Join Date: Aug 2003
Location: Las Vegas, NV
Age: 39
Posts: 21,454
Received 1,146 Likes
on
801 Posts
Rep Power: 485 

DIY Change your ignition switch light color. PROGRESS PICS ADDED!!!
Because I'm bored and I have nothing but time and a **** ton of SMD LEDs lying around..
I figure I'd share another interior lighting mod I just completed. Earlier, I posted a text only guide with nothing more than an end result picture. I got bored again and took pics for you guys. Enjoy.
It�s a pretty straightforward mod, so if you can't figure out how to take **** apart/put it back together, stop right now, go in your house/apartment/living quarters, and watch some World Cup. lol
Tools required:
-#2 Philips Screwdriver
-#2 Philips Screwdriver bit
-�� Drive Ratcheting Socket Wrench with ��Socket OR offset screwdiver if you have one
-Knife or thin flathead screwdriver (for prying)
-Soldering Iron (and obviously some solder. I used 60/40 .032� Rosin-core solder) [not pictured]
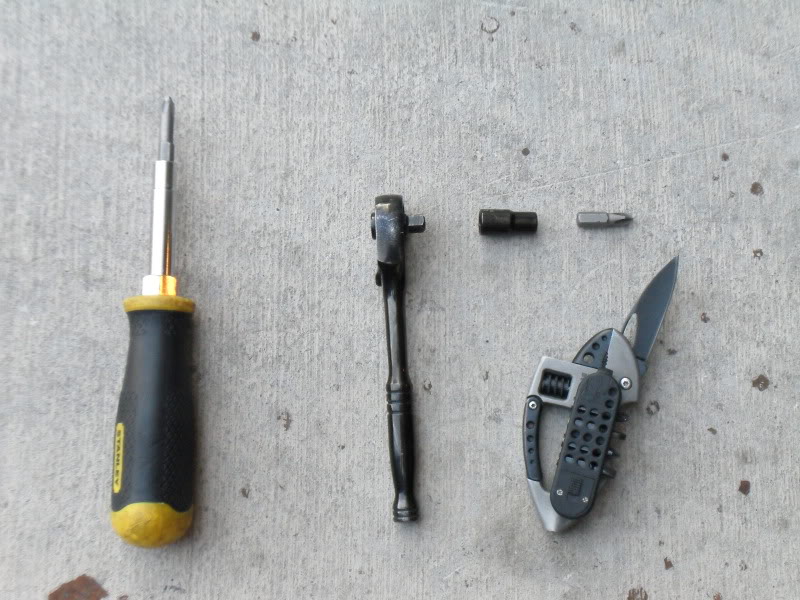
Tools that help a LOT:
-Tweezers
-Small pair of pliers
-Electrician�s helping hands
Procedure:
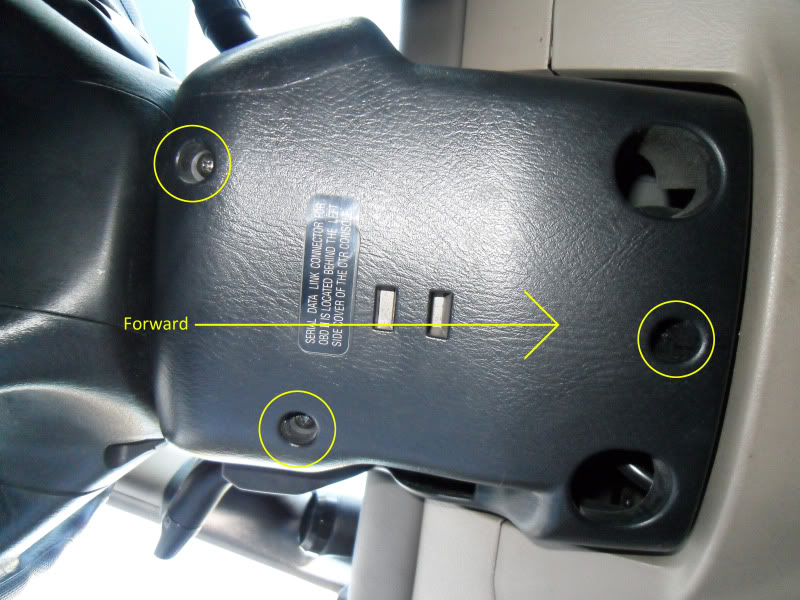
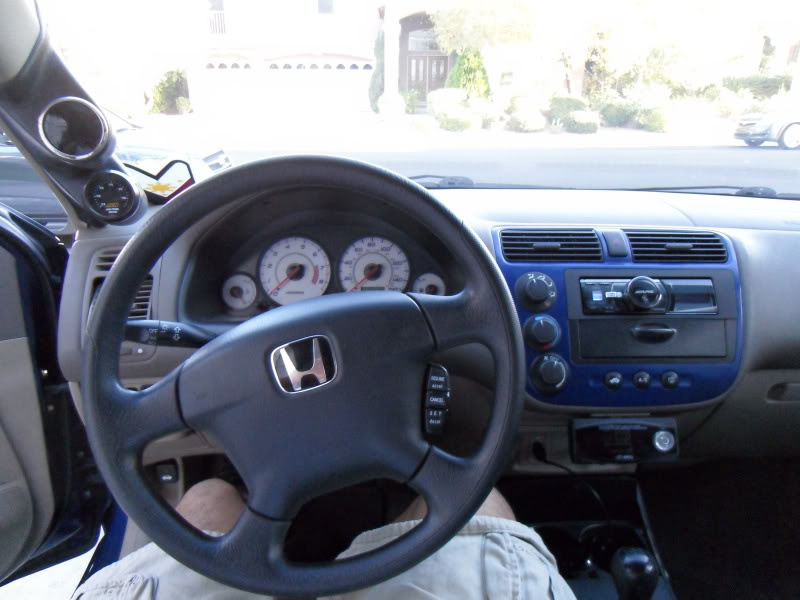
-Locate and remove the 3 screws from bottom of steering column cover. Note that the two that come out of the aft-most holes are tapping screws and the forward most is a machine screw.
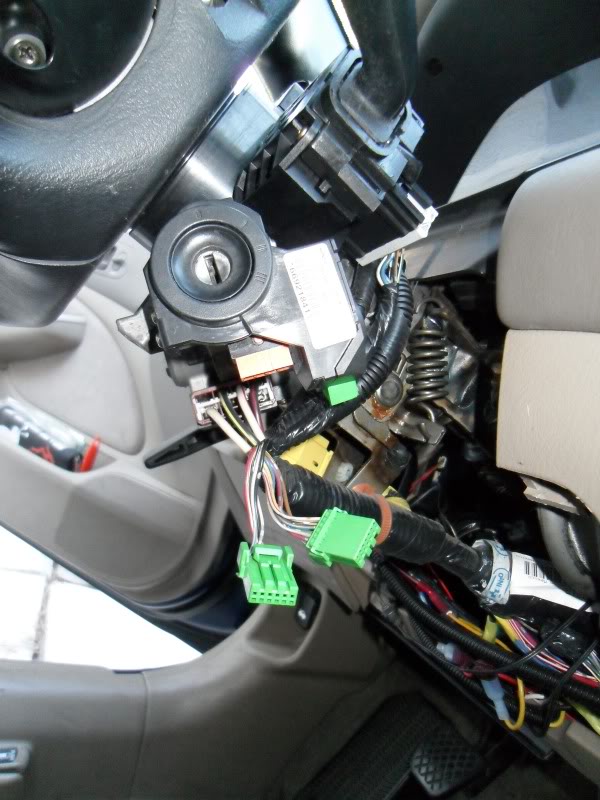
-Pull adjustment lever down and finangle the bottom cover off. It helps to take the fuse access panel off. If you grab and pull the bottom cover, it should release the clips from the top cover to take that off.
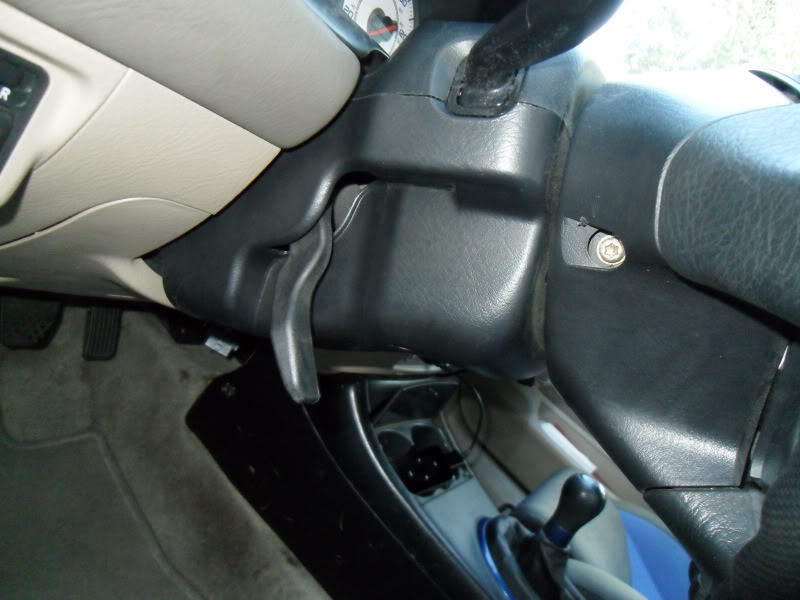
Grab and Gently pull here
Top cover popped off
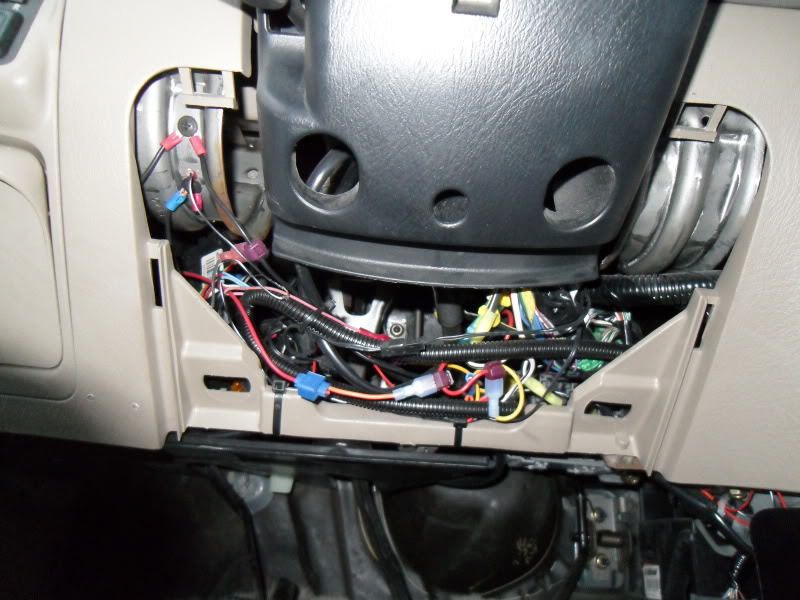
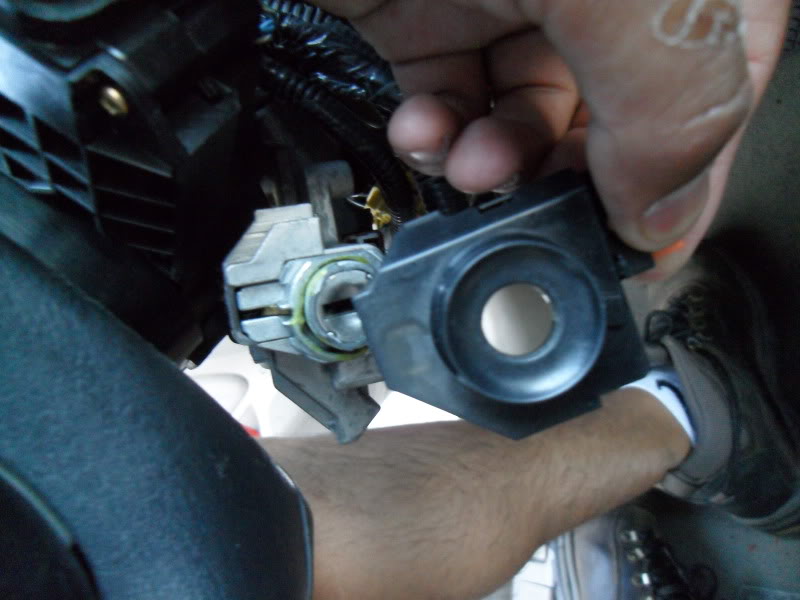
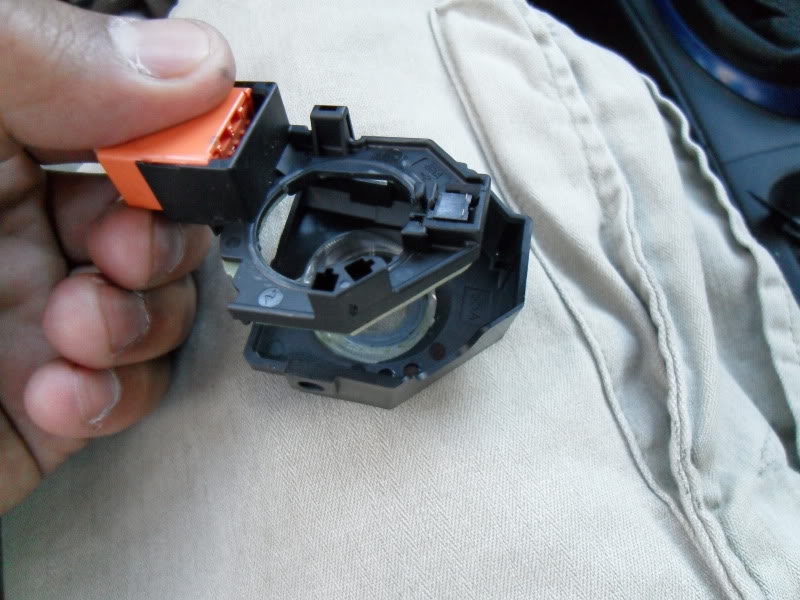
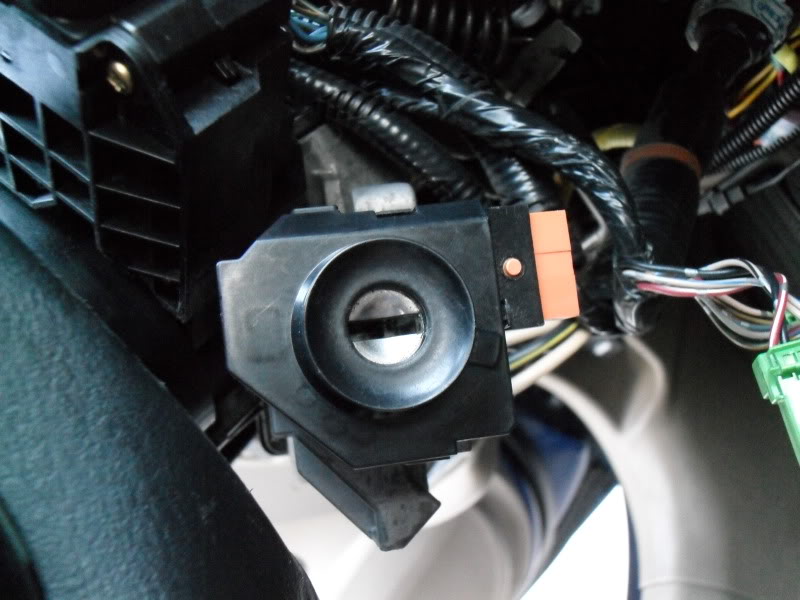
-Meet your ignition switch (top left). There are 4 screws holding this thing down. Working clockwise, there are 2 on the aft/bottom, one on the top, and one on the forward/bottom end. You�ll probably have to nudge some split wire loom out of the way to access it with a screwdriver.
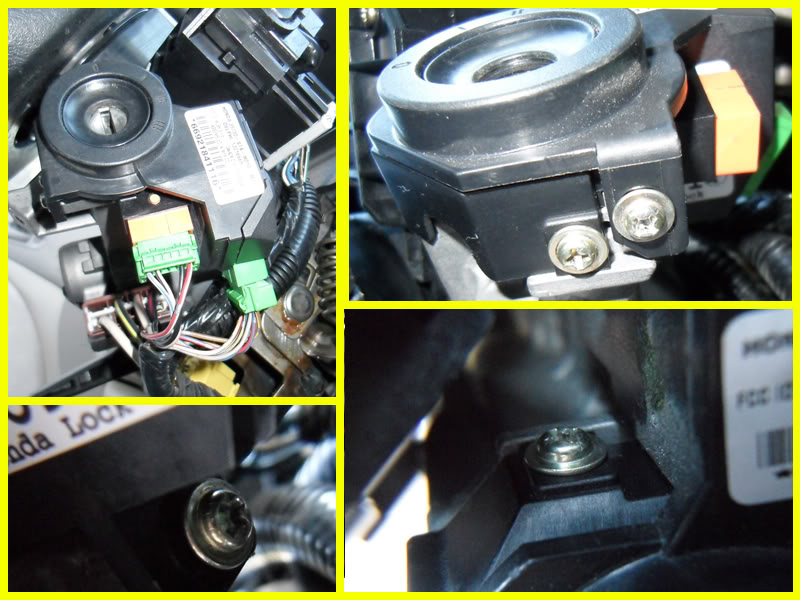
-Remove the 2 plugs green attached to the ignition switch.
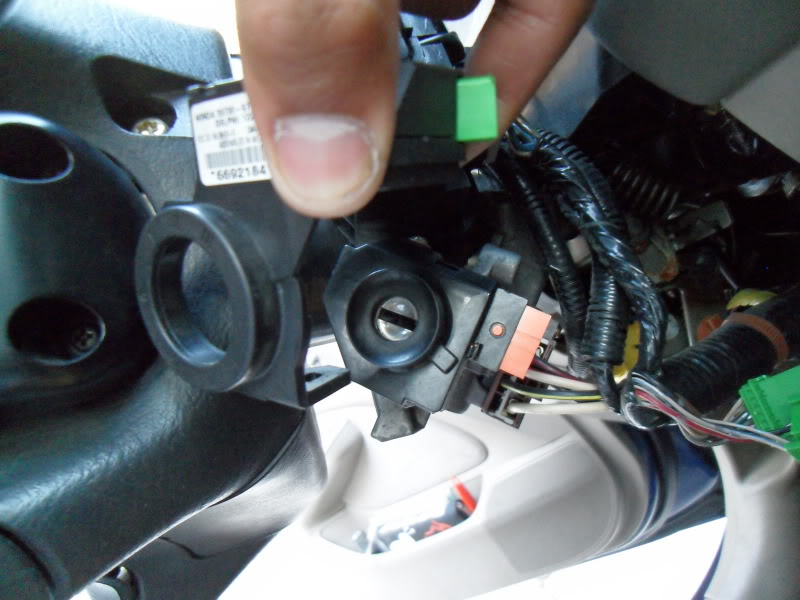
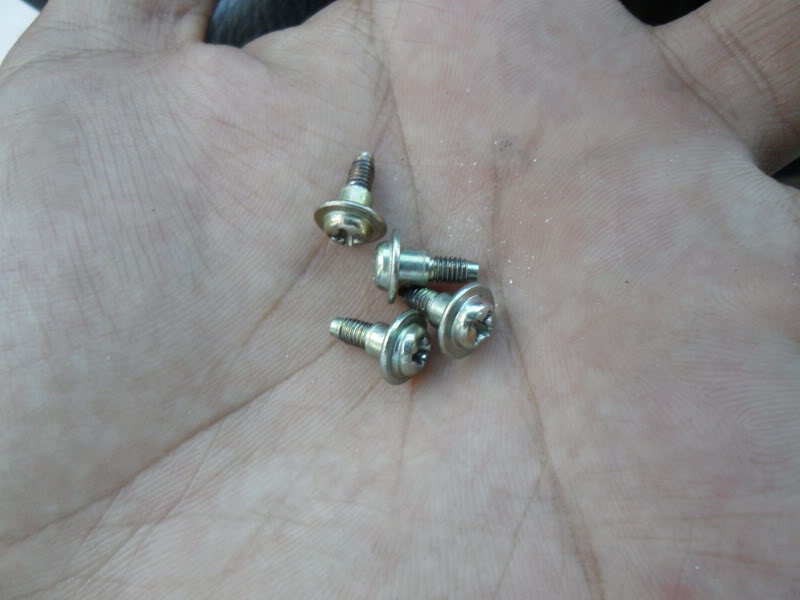
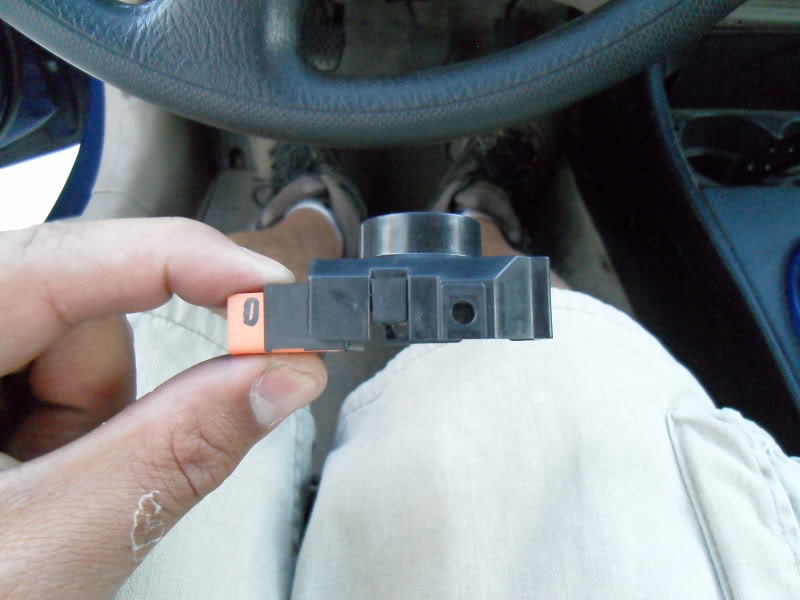
-Remove the 2 aft/bottom screws, then the front/bottom screw. The outer-most piece should come off fairly easily. This also allows for easier access to the top screw.
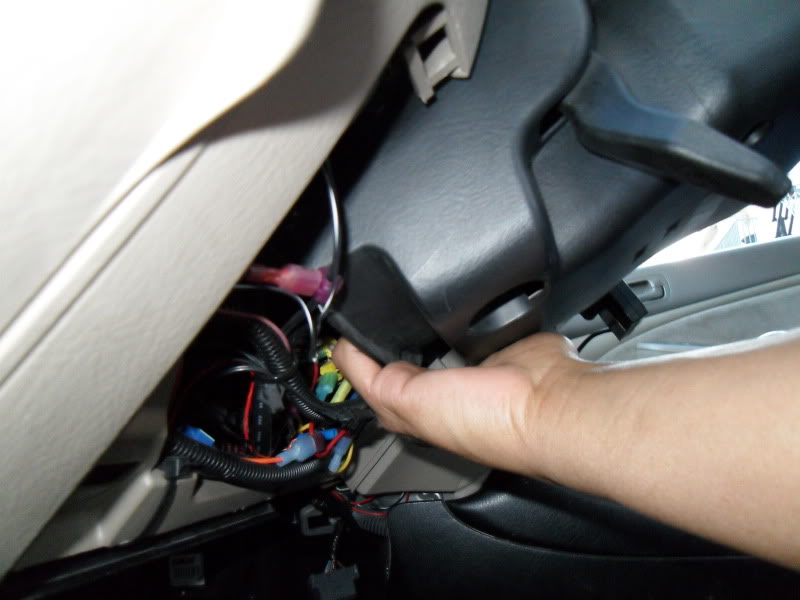
-Use the #2 Philips screwdriver bit and the �� drive socket wrench to remove this screw. If you have an offset screwdriver, it�ll work the same.
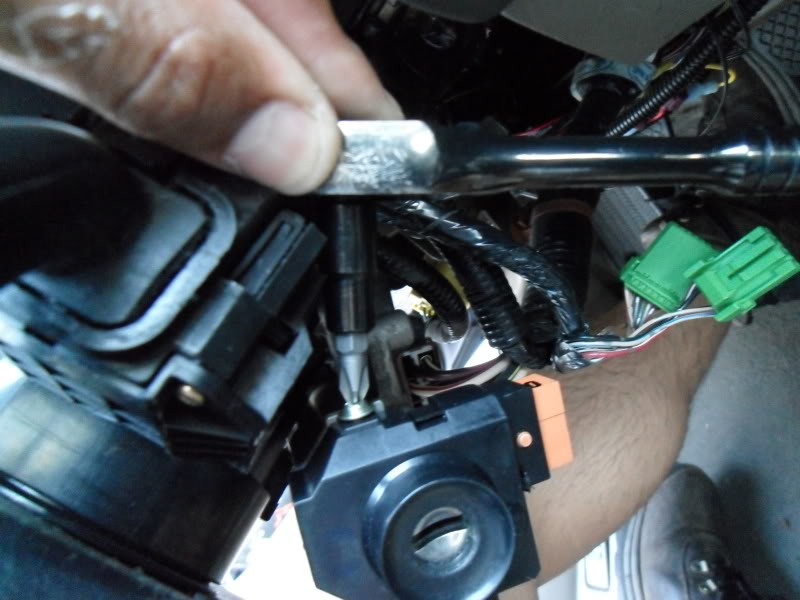
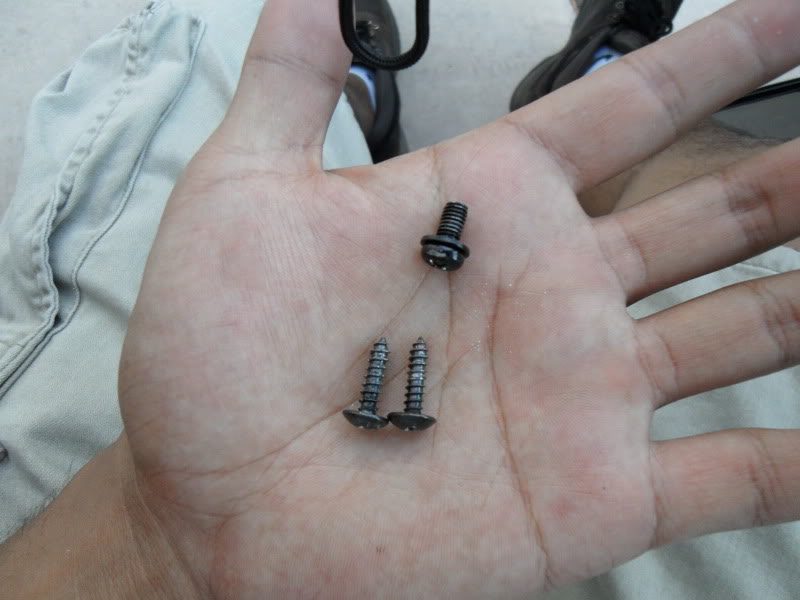
*Don�t worry about mixing up these screws because they�re all the same*
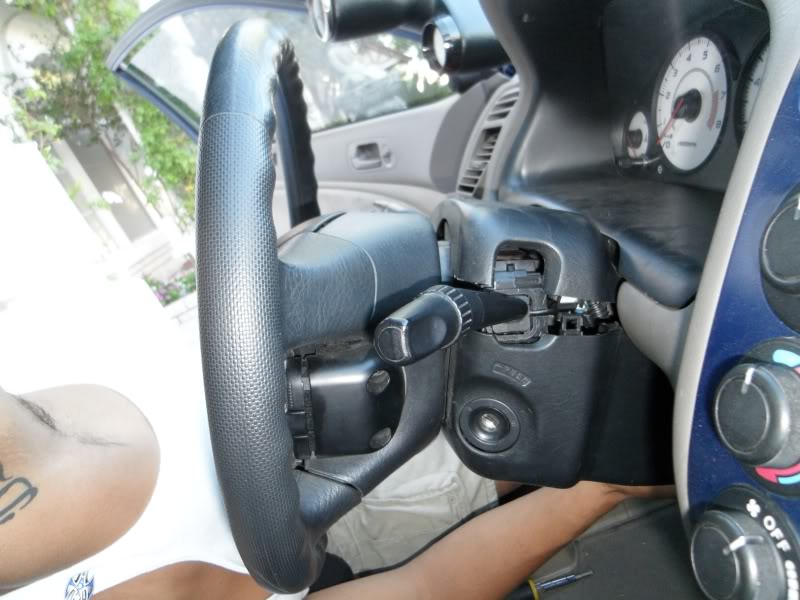
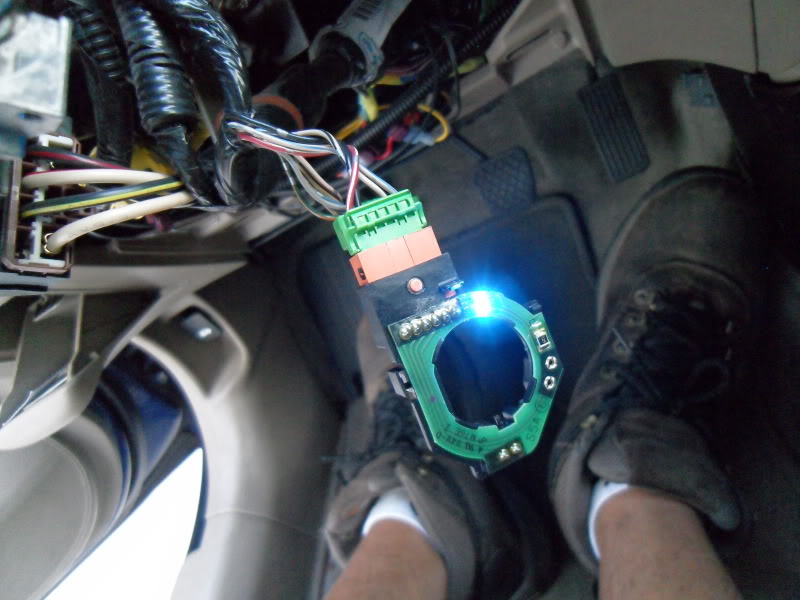
-Once you get the top screw off, the inner cover piece should come off easily. This is the piece that has the LED and diffuser ring.
-Use your knife or thin flathead screwdriver to CAREFULLY pry the plastic cover off. There are only 2 clips that you need to release.
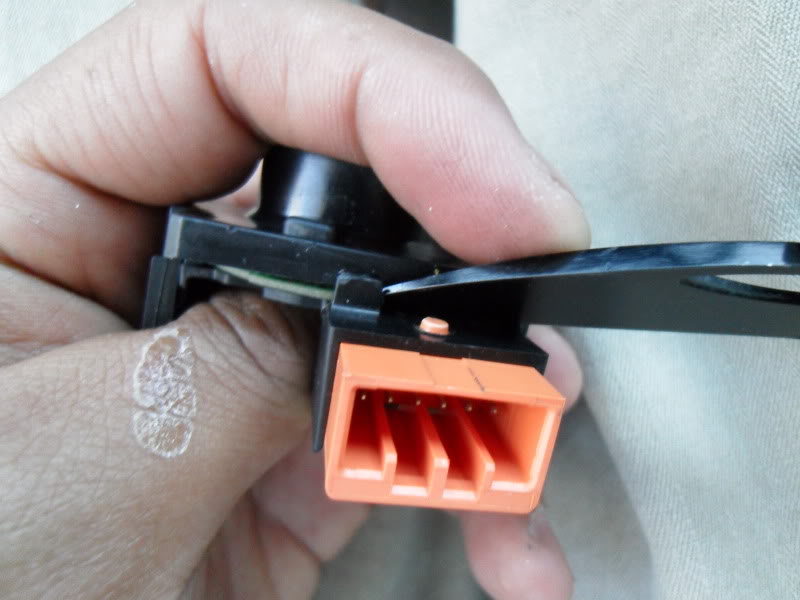
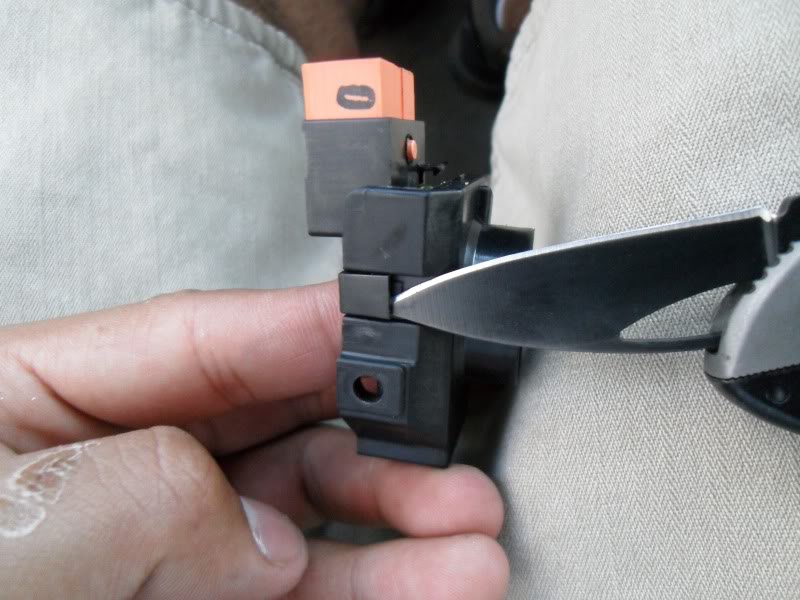
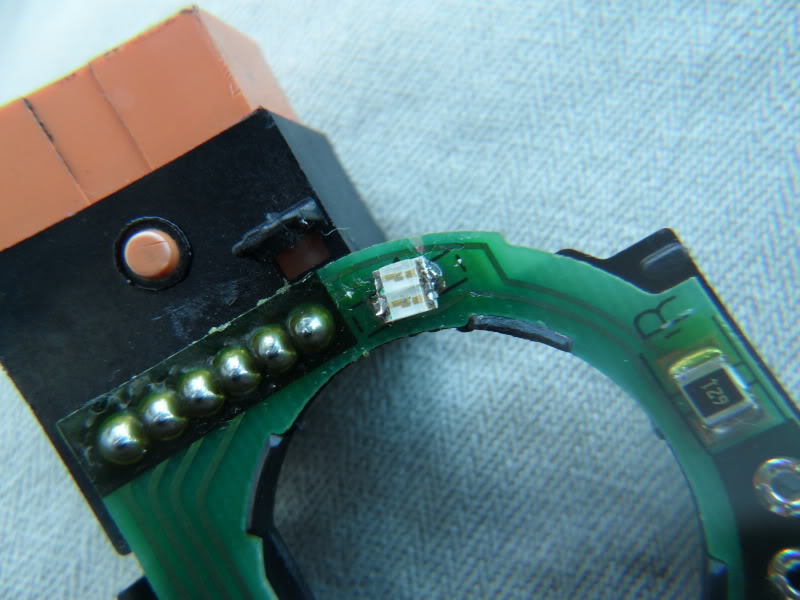
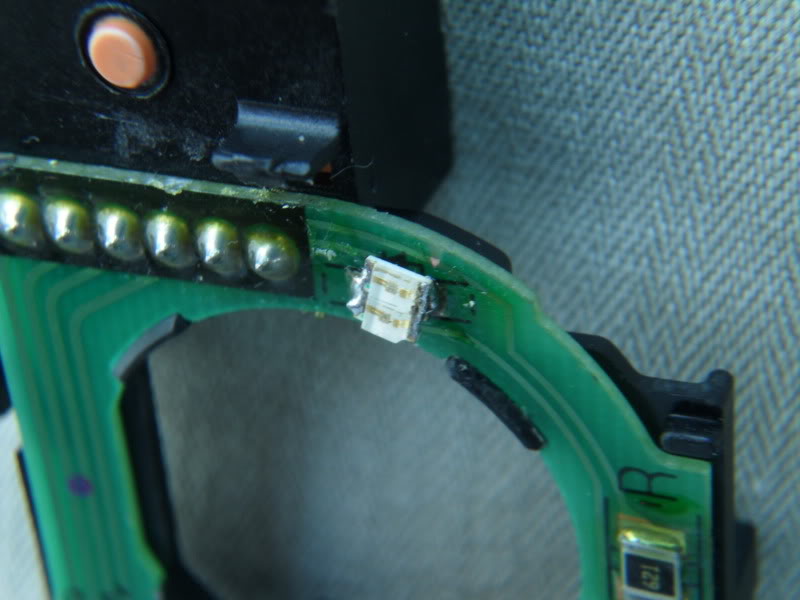
-The diffuser ring is part of the black cover, and the LED is the little white thing close to the orange plug. If you look a little closer, just outboard of it (inboard would be toward the center of the circle that is the green circuit board), you'll see a little symbol that looks like this (without the words or arrows. That�s the electrical symbol for a diode. The cathode of your new LED attaches to the side that�s on the base of the triangle):
Tricky thing about this part is every component on this circuit board is covered with a clear anti-corrosion coating of sorts, so it makes desoldering the LED either tricky or, in my case, not an option. I took some mini side cutters and cut the old LED off. It exposed the old solder which gave me somewhere to solder the new LED(s) to. **NO PIC FOR YOU**
-I took 2 of my 1206 SMD LEDs, soldered them together (anode to anode, cathode to cathode, i.e. wired in parallel), then soldered them to the board. Not the prettiest soldering job I�ve ever done, but it works just fine. If you look closely, you can kinda see the diode symbol under my LED set.
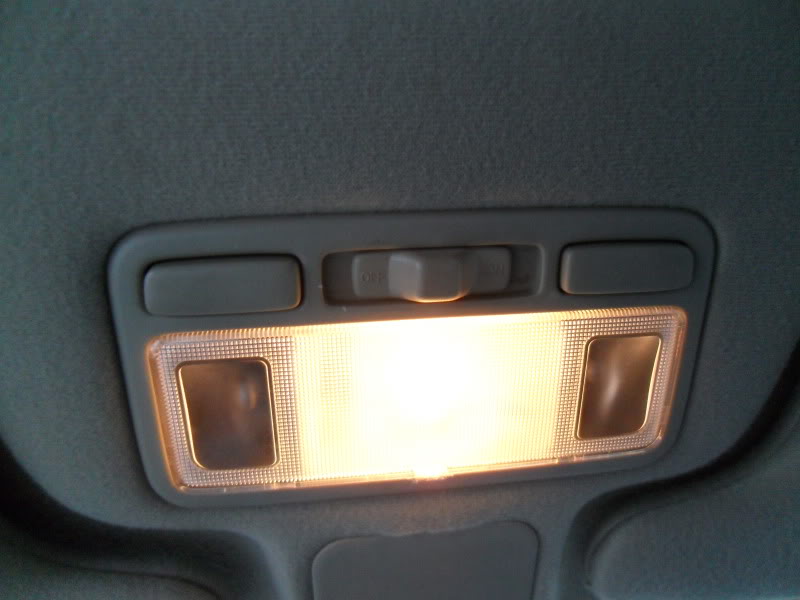
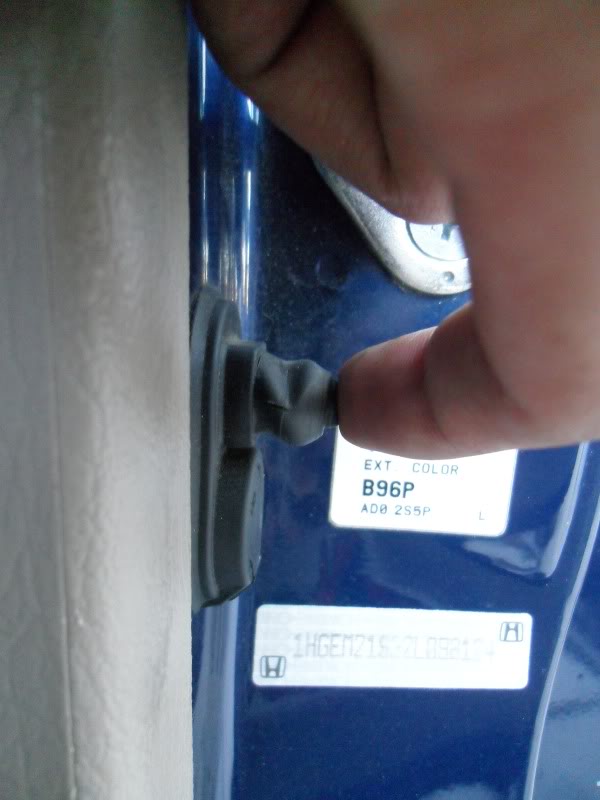
-Before you put it all together, plug it in (only one of the plugs fits) and test it out. Make sure you dome light switch is set to �door.� If it is and nothing happened when you plugged it in, chances are you left your door open too long and the door timer timed out. Push and release the door switch located in the door jamb to make your car think the door was closed and opened again. If still nothing happens, take a 12V power supply (with a 470Ω resistor on the positive end) and test your LED. If it doesn�t work one way, try the other way. If your LED works, you installed it backwards. If your LED still doesn�t work, you burned out the LED while soldering. Repeat the LED switch process to try again.
Dome light switch in �door� position
Door Switch
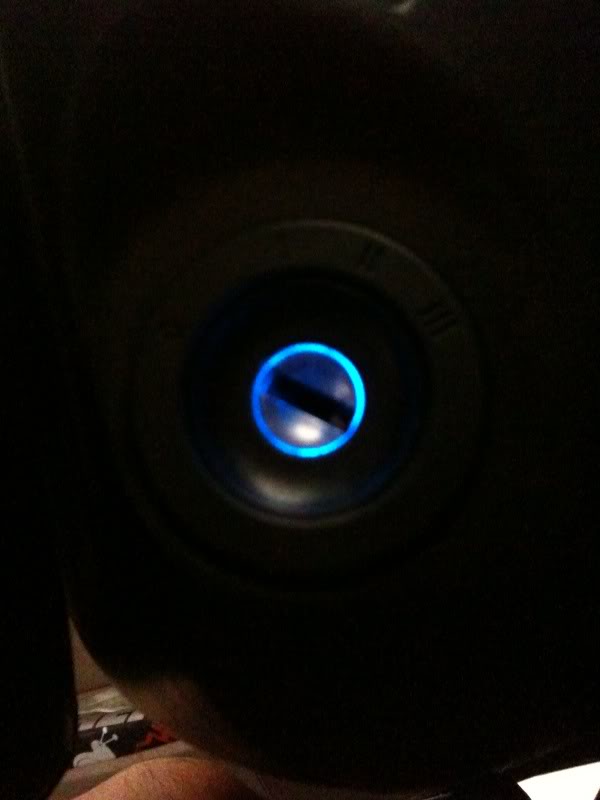
SUCCESS!!!
-If it works, congrats. Put everything back together. Everything only goes in one way, so have at it. If you can�t figure it out, go back to pre-school where you tried to shove the square block in the triangle hole, and figure out wtf happened. Lol
Only clips together one way
Wonder twins activate
Again, **** only goes together one way
-After you put everything back together, Readjust your seat and/or steering wheel, sit back, and admire how everything (should) looks the same as before you started, except you don�t have a weak *** amber LED lighting up your key hole. (And for you that wanted to see what painting the radio bezel looks like, take a gander to the right. There�s my blue painted bezel.)
Total Time: less than 30 minutes. I started out 15 minutes into the England/Algeria game, and I had everything buttoned up before halftime. I think it took me 15 minutes to take everything apart while taking pictures for this DIY guide
Notes: While taking everything apart, I doubt you can use a 3, 5, or 10(lol)mm LED you can pick up from RadioShack for this mod. However, you can buy SMD LEDs in bulk from ebay for cheap. Usually come from Hong Kong, so that raises questions about quality, but I've had these in my dash lights now for 30+ hours of use, and none of them have lost their color or brightness, nor have **** themselves on me. Plus, you can use the extra LEDs to change all your dash lights to match. I got a 100 pack of blue 1206 SMD LEDs for 6 bucks shipped, as well as 100 1206 Red SMD LEDs for 7 bucks shipped, one came from Hong Kong, the other from Shanghai. Also, after searching a bit, if you find PLCC-2 SMD LEDs, that�d probably be one of the better options. They got those all over eBay, too. V-LEDs.com uses those kinds of SMD LEDs for their bulbs.
Disclaimer: I'm not responsible for damage you may cause should you choose to do this mod.
I figure I'd share another interior lighting mod I just completed. Earlier, I posted a text only guide with nothing more than an end result picture. I got bored again and took pics for you guys. Enjoy.
It�s a pretty straightforward mod, so if you can't figure out how to take **** apart/put it back together, stop right now, go in your house/apartment/living quarters, and watch some World Cup. lol
Tools required:
-#2 Philips Screwdriver
-#2 Philips Screwdriver bit
-�� Drive Ratcheting Socket Wrench with ��Socket OR offset screwdiver if you have one
-Knife or thin flathead screwdriver (for prying)
-Soldering Iron (and obviously some solder. I used 60/40 .032� Rosin-core solder) [not pictured]
Tools that help a LOT:
-Tweezers
-Small pair of pliers
-Electrician�s helping hands
Procedure:
-Locate and remove the 3 screws from bottom of steering column cover. Note that the two that come out of the aft-most holes are tapping screws and the forward most is a machine screw.
-Pull adjustment lever down and finangle the bottom cover off. It helps to take the fuse access panel off. If you grab and pull the bottom cover, it should release the clips from the top cover to take that off.
Grab and Gently pull here
Top cover popped off
-Meet your ignition switch (top left). There are 4 screws holding this thing down. Working clockwise, there are 2 on the aft/bottom, one on the top, and one on the forward/bottom end. You�ll probably have to nudge some split wire loom out of the way to access it with a screwdriver.
-Remove the 2 plugs green attached to the ignition switch.
-Remove the 2 aft/bottom screws, then the front/bottom screw. The outer-most piece should come off fairly easily. This also allows for easier access to the top screw.
-Use the #2 Philips screwdriver bit and the �� drive socket wrench to remove this screw. If you have an offset screwdriver, it�ll work the same.
*Don�t worry about mixing up these screws because they�re all the same*
-Once you get the top screw off, the inner cover piece should come off easily. This is the piece that has the LED and diffuser ring.
-Use your knife or thin flathead screwdriver to CAREFULLY pry the plastic cover off. There are only 2 clips that you need to release.
-The diffuser ring is part of the black cover, and the LED is the little white thing close to the orange plug. If you look a little closer, just outboard of it (inboard would be toward the center of the circle that is the green circuit board), you'll see a little symbol that looks like this (without the words or arrows. That�s the electrical symbol for a diode. The cathode of your new LED attaches to the side that�s on the base of the triangle):
Tricky thing about this part is every component on this circuit board is covered with a clear anti-corrosion coating of sorts, so it makes desoldering the LED either tricky or, in my case, not an option. I took some mini side cutters and cut the old LED off. It exposed the old solder which gave me somewhere to solder the new LED(s) to. **NO PIC FOR YOU**
-I took 2 of my 1206 SMD LEDs, soldered them together (anode to anode, cathode to cathode, i.e. wired in parallel), then soldered them to the board. Not the prettiest soldering job I�ve ever done, but it works just fine. If you look closely, you can kinda see the diode symbol under my LED set.
-Before you put it all together, plug it in (only one of the plugs fits) and test it out. Make sure you dome light switch is set to �door.� If it is and nothing happened when you plugged it in, chances are you left your door open too long and the door timer timed out. Push and release the door switch located in the door jamb to make your car think the door was closed and opened again. If still nothing happens, take a 12V power supply (with a 470Ω resistor on the positive end) and test your LED. If it doesn�t work one way, try the other way. If your LED works, you installed it backwards. If your LED still doesn�t work, you burned out the LED while soldering. Repeat the LED switch process to try again.
Dome light switch in �door� position
Door Switch
SUCCESS!!!
-If it works, congrats. Put everything back together. Everything only goes in one way, so have at it. If you can�t figure it out, go back to pre-school where you tried to shove the square block in the triangle hole, and figure out wtf happened. Lol
Only clips together one way
Wonder twins activate
Again, **** only goes together one way
-After you put everything back together, Readjust your seat and/or steering wheel, sit back, and admire how everything (should) looks the same as before you started, except you don�t have a weak *** amber LED lighting up your key hole. (And for you that wanted to see what painting the radio bezel looks like, take a gander to the right. There�s my blue painted bezel.)
Total Time: less than 30 minutes. I started out 15 minutes into the England/Algeria game, and I had everything buttoned up before halftime. I think it took me 15 minutes to take everything apart while taking pictures for this DIY guide
Notes: While taking everything apart, I doubt you can use a 3, 5, or 10(lol)mm LED you can pick up from RadioShack for this mod. However, you can buy SMD LEDs in bulk from ebay for cheap. Usually come from Hong Kong, so that raises questions about quality, but I've had these in my dash lights now for 30+ hours of use, and none of them have lost their color or brightness, nor have **** themselves on me. Plus, you can use the extra LEDs to change all your dash lights to match. I got a 100 pack of blue 1206 SMD LEDs for 6 bucks shipped, as well as 100 1206 Red SMD LEDs for 7 bucks shipped, one came from Hong Kong, the other from Shanghai. Also, after searching a bit, if you find PLCC-2 SMD LEDs, that�d probably be one of the better options. They got those all over eBay, too. V-LEDs.com uses those kinds of SMD LEDs for their bulbs.
Disclaimer: I'm not responsible for damage you may cause should you choose to do this mod.
Last edited by xRiCeBoYx; 06-18-2010 at 10:34 PM. Reason: Because I'm the shit.
 06-18-2010
#2
Remebers the old days
Hey! Look At Me!! I'm a Supporting Member!!
iTrader: (1)
Join Date: Oct 2002
Location: Bossier City, LA
Age: 43
Posts: 987
Likes: 0
Received 1 Like
on
1 Post
Rep Power: 273 Re: DIY Change your ignition switch light color. Sorry, no progress pics.
Well check you out mister handy man. Good ****.
06-18-2010
#3
Administrator
Hey! Look At Me!! I'm a Supporting Member!!
Administrator
Thread Starter
iTrader: (22)
Join Date: Aug 2003
Location: Las Vegas, NV
Age: 39
Posts: 21,454
Received 1,146 Likes
on
801 Posts
Rep Power: 485 Re: DIY Change your ignition switch light color. Sorry, no progress pics.
I was bored.. And your poly motor mount DIY made me jealous. hahahaa
06-18-2010
#4
Administrator
Hey! Look At Me!! I'm a Supporting Member!!
Administrator
Thread Starter
iTrader: (22)
Join Date: Aug 2003
Location: Las Vegas, NV
Age: 39
Posts: 21,454
Received 1,146 Likes
on
801 Posts
Rep Power: 485 Re: DIY Change your ignition switch light color. PROGRESS PICS ADDED!!!
Got bored and added pics for this DIY
w00t! 10,500th post!
w00t! 10,500th post!
06-19-2010
#5
Premium Member
Hey! Look At Me!! I'm a Supporting Member!!
iTrader: (95)

Join Date: Sep 2002
Location: NV
Age: 43
Posts: 51,241
Likes: 0
Received 18 Likes
on
13 Posts
Rep Power: 787 Re: DIY Change your ignition switch light color. PROGRESS PICS ADDED!!!
nice diy, i need to do this sometime cause i hate the green led on my sedan.
07-14-2010
#6
Registered!!

Join Date: Oct 2007
Age: 44
Posts: 48
Likes: 0
Received 0 Likes
on
0 Posts
Rep Power: 0 
Re: DIY Change your ignition switch light color. PROGRESS PICS ADDED!!!
Many thks!
 07-14-2010
#7
Administrator
Hey! Look At Me!! I'm a Supporting Member!!
Administrator
Thread Starter
iTrader: (22)
Join Date: Aug 2003
Location: Las Vegas, NV
Age: 39
Posts: 21,454
Received 1,146 Likes
on
801 Posts
Rep Power: 485 Re: DIY Change your ignition switch light color. PROGRESS PICS ADDED!!!
You know, I never even though about that. I figured it was standard on all models, amber for coupes, green for sedans. If anyone with a DX or LX (or if gearbox knows.. lol) want's to chime in, by all means
07-14-2010
#8
Premium Member
Hey! Look At Me!! I'm a Supporting Member!!
iTrader: (95)
Join Date: Sep 2002
Location: NV
Age: 43
Posts: 51,241
Likes: 0
Received 18 Likes
on
13 Posts
Rep Power: 787 Re: DIY Change your ignition switch light color. PROGRESS PICS ADDED!!!
yeah EX only. they make a big deal about it in the brochures.
07-14-2010
#9
Administrator
Hey! Look At Me!! I'm a Supporting Member!!
Administrator
Thread Starter
iTrader: (22)
Join Date: Aug 2003
Location: Las Vegas, NV
Age: 39
Posts: 21,454
Received 1,146 Likes
on
801 Posts
Rep Power: 485 Re: DIY Change your ignition switch light color. PROGRESS PICS ADDED!!!
Goes to show I never read the brochure.. hahaha

The following users liked this post:
xRiCeBoYx (03-09-2022)

Thread
Thread Starter
Honda Civic Forum
Replies
Last Post
pincookie1
6th Generation Civic 1996 - 2000
2
05-04-2015 12:22 PM
tkcne
Mechanical Problems/Vehicle Issues and Fix-it Forum
9
04-18-2015 02:33 AM
BREADFAN
Mechanical Problems/Vehicle Issues and Fix-it Forum
0
04-15-2015 08:58 AM

