DIY: blue glow needles!
 12-07-2003
#1
Premium Member
Hey! Look At Me!! I'm a Supporting Member!!
Thread Starter
iTrader: (95)

Join Date: Sep 2002
Location: NV
Age: 43
Posts: 51,241
Likes: 0
Received 18 Likes
on
13 Posts
Rep Power: 787 

The DIY is officially finished. I have added all that I know to make this as easy as possible. Hopefully it will save you some time and guide you in the right direction. Remember that with a project of this magnitude, you're bound to run into problems. Just keep at it and you will be happy.
Everything you need to know about making your needles, gauge lights, console lights, power window switch, and shifter lights (auto only) blue is in this DIY now.
If you attempt this project, please read through all the posts made here. There were numerous updates and discoveries made after the DIY was written (some by me, and some by other members).

IMPORTANT NEW UPDATE!! ******************
After only a few weeks, the blue backlight bulbs for the cluster have started to fade. I've tried numerous methods to fix this. White LEDs did not work, nor did newly painted bulbs. I decided to try blue EL wire. What I did was run the wire inside the cluster on the back of the gauges. I had enough wire (5 ft) to run it twice.
I actually got a second and third EL kit and added another two layers to each gauge. The wires were placed on the tick marks and the numbers to get an even light. The wire lights up blue normally, but in the cluster it gives a bright aqua color. It still looks nice and gives more even lighting than just bulbs.
I also taped off the smaller tick marks and the km/h numbers from the back, so only the big marks and numbers would light up. Looks better like this.
NEW NOTES AND ADDITIONS: ****************
One thing I did want to change involves painting the needles. Once you clear them using alcohol, you want to brush on a medium coat of white paint on the bottom only (not the top). And only paint the bottom part that sticks out of the holder. The part inside the round holder is already white from the holding clip.
After some thinking and planning, I've decided to go for an all blue interior. Here's what I did.
+ Redid entire dash with blue LEDs. For the control *****, I used 2 LEDs for each of the two bulbs in there and pointed the LED outward. I also used one LED for each of the other buttons (A/C, defrost, recirculate). I used only 1 LED for the voltmeter. Everything came out so good for a change. The control ***** use light guides to channel light, so they won't be as bright as the rest of them.
+ I also took out the bulbs that light up the shift indicator on the gauges in an automatic car. This was the only way to keep everything blue and matching. And also the cruise bulb, so it doesn't light up green on the gauges when it's on.
Finished product!


BASIC LED HOOKUP:
If any of you are wondering what a LED or resistor is and how to connect them, here it is. LED stands for light emiting diode. Basically a cup in the center of the plastic casing uses electrical energy to excite photons and give off light of a certain wavelength from the electromagnetic spectrum. An LED has two wires coming out of it. The longer one is the positive, and the shorter one is negative. Now you can't just hook it up to a 12V power source, or it will burn out. You need a resistor in front of the power lead to limit the amount of current that reaches it. Different colored LEDs have different voltage requirements. For blue and white, it's usually 3.5-3.7V. I used a 680ohm 1/2watt resistor for each blue LED. I've since found a calculator that says 560 ohm would be the optimal, since it would make them slightly brighter. Here's a diagram on how to hook them up. I would solder the connections, although you can twist them together and use e-tape if you want.
Now you can hook up multiple LEDs in series for a single circuit. I would recommend no more than three in a row. Just hook the ground lead from the first LED to a resistor, and then to the power lead of the second LED.
UPDATE AND NEW DIY--EL GAUGE BACKLIGHT (Indiglo)
Now here is how I did the backlight for the gauge faces. You still need to clear the back side with acetone to get rid of the stock color. Using the EL cable, it is possible to get even lighting for all the numbers on the gauge cluster. Here are some pics that show exactly where the cable was run. This is from the back side, with the circuit board removed. I used the supplied super glue to bond the cable to the plastic. Big mistake because it clouded the plastic shield. I used three kits of 5ft wire each to get it bright enough and light up all the numbers.
Then you wire them up just like indiglos. Power and ground, plus the plug to the inverter. I hid the small box to the right of the cluster in a hole, so it's out of the way. For some reason, I had some connection problem, so make sure they're spliced well. I may have to open it up and check it later. Finally I found a practical use for a ricey product

Now this is what happened after I did the initial install. I put superglue everywhere to keep the wire in place, and it totally messed up the plastic cover.

There were much worse spots where the light output was less. So I grabbed the trusty soldering iron and started melting out pieces of the light shield that were messed up. Be careful to try and keep it in one piece so everything goes back on right. And open a window cause you don't want to be smelling glue and plastic fumes! It really burns the eyes. Anyway, here's what I did to all the plastic that was covering the numbers. Once you're done, you need to go back and melt down the plastic that's sticking up around the edges, so the faces will fit back on properly.

Keep in mind that I only had to do this because of the glue. If you use tape or something to attach the wire, then the stock plastic shield should not block the light. One other thing I did was add chrome paper underneath the wires to reflect more light up to the gauges.
UPDATE AND NEW DIY--POWER WINDOW SWITCH (Blue LED)
**This was by far the hardest part of this entire DIY. I got so frustrated trying to do this. You need alot of patience to get it right. The pics are just to see how stuff comes apart. Most of it is either held on by tabs, clips, or screws. The door panel does not need to come off to get the window assembly out. You will also need very thin magnet wire to set everything up. Thicker wire won't fit between the two halves of the assembly. One of the hard parts is to make sure the driver window switch works mechanically after putting the LED inside. The LED must be shaved down alot for it to fit. I just cut out the factory LED that was in there.

Now here is the wiring part. I found out which two wires have to be tapped for ground and power. The ground on the plug is the black wire, and positive wire is the yellow one where my finger is pointing. I stripped a small section of each thick wire and then wrapped magnet wire around it to make the connection. Just be sure and tape everything up.


https://www.civicforums.com/forums/h...blueglow11.jpg
Just don't forget the 680ohm resistor before the LED to reduce the power coming in. I forgot and had to do everything all over again. You can imagine how pissed I was.
UPDATE AND NEW DIY: SHIFTER LIGHTS FOR AUTOMATIC
I've finally tried to do this again and got very good results. Here are some pics of what I did.
First you will need to take out the center console and pry off the shifter trim. You are trying to get to the plastic piece that has the P, R, N, D letters on it. Here is the backside of that piece. Now last time, I tried to use acetone on the #1 icon on the bottom. You can see that it totally stripped the paint away.

Here is what you need to do. Get some tissues and a bottle of 95% alcohol from the store. No acetone!! Now you want to slowly rub the tissue with alcohol on it to remove the layers one at a time. The first layer that comes off is the white on the very back. Then you should start to see a green layer underneath that (may be red or orange on a coupe). Gently rub the green off until you can see white underneath. Be very careful not to take off the last layer of white. Just go over the green parts until most of the color is gone. Don't mess up!! If you take off the last layer of white paint, you're buying a new shift assembly from Honda for $55!
Here it is with all the numbers and letters done. Just take your time and it will work. The alcohol is not powerful enough to take off the surrounding black paint, but it will take off the white from the numbers. Be careful.You can still see a small amount of green around the edges, but that's okay.

Now that the numbers and letters are cleared, you can install the blue LEDs. I got three altogether. One goes under the R, and the other two go under the D, D3, and 2 icons.
IMPORTANT--Take some white office paper and cut a piece to fit under the plastic piece. This is to dim the light to match the rest of the dash. Without this, it wil be extremely bright.

The P and N letters have paint that is just too dark for the blue light to illuminate. They will be dark. Still looks great at night.
UPDATE AND FINAL DIY ADDITION--moonroof, mirror, and cruise lights!
Okay, as most of you know I gave up on this a while back and said it was impossible. Well, here we are after a third all-day attempt. I finally got it to work.
Basically, I used one LED for the mirror button, one for cruise, and three for the moonroof switch (hardest). You really need thin, coated magnet wire to do this. I did the moonroof as 3 LEDs in the same series circuit. The top and bottom LEDs I had to grind way down so they would fit. The third one is in the middle. The hardest part is getting everything in there and having it light up correctly. As you can see, it's still not lit up perfectly, but it's good enough for me. Here are some pics to ponder over.
You really have to go out and hook everything up to play with the direction of the LEDs so everything faces forward. I didn't have the patience to do this to everything and ended up leaving the bottom light the way it was.
Once you have all the switches taken apart, put the back portion in the assembly and then feed the LEDs and wires through the original light bulb hole. Otherwise you won't be able to push the switch back in. Good luck, you're gonna need it for this one.


START OF NEEDLE DIY:
I've had many requests for a DIY on this already, so here goes. I'm watching Jerry Springer while doing this, so I may have left some things out. This DIY is for a sedan, but will probably be similar to the coupe as well. You should not try this unless you're familiar with soldering and taking your entire gauge cluster apart.
If you have an 01 civic, the DIY should be easy. I had an 02, so this will cover how to use parts from an 01 cluster to make it work.
Basic parts needed:
-big toolkit of some kind with screwdriver and other stuff
-soldering gun with accessories
-blue LED lights (6) or other color
-680ohm resistors (4)
-power drill with bits
-white transparent glass paint
-liner brush for painting
-electrical tape
-18 gauge wire (black/red)
-acetone
-90% ethyl alcohol
-many more things that I'll mention along the way...
Let's begin. Here's what started this project. My ruined 02 cluster face with paint all over.

First, I tried taking my 02 needles apart and broke them in the process. They won't go back together. lol--at first I tried painting the needles blue, but it will be very dim. The needles are orange plastic on the 02, so you need the needles from an 01 in order to continue.
Here is my new 01 cluster off ebay for $85. I like the black face much better.

When you take the gauges apart, notice the layer of paint on the back side. This gives the gauge lights a nasty greenish color. I used a cotton cloth and lots of acetone to clear off all the paint on the back side only! This will make light shine through the gauges much better. Now don't forget to tape off the parts on the back that have the signal, brights, ABS, etc icons. You could use condoms to change the backlight color, but it will be dimmer. Be very careful with the acetone and tape off the front side or they will end up ruined like mine in the first pic.

Now I'm going to start describing how to do the blue glow needles. I won't go into detail here, but you need to completely remove your cluster from the car and bring it inside. Pop open the front so you have access to the needles. Make sure the speedo and tach needles are at the stop points and pull them straight up while grasping low on the needle. Put the gas and temp needles down to their stop points and pull them out. NOTE: I've pulled out my needles at least 20 times and have had no problems with them not working. Once the needles are apart, you'll want to separate all the parts. Stick a thin knife into the sides of the bottom of the needle and gently pry up. The bottom should eventually pop off.
Once they are all apart, take the clear needle and examine it. You should see a painted orange stripe on the top and bottom. Using 90% ethanol (alcohol) and a soft cloth, gently wipe off the paint. DO NOT use acetone to do this or you will cloud the plastic!
Now if you have an 02 cluster and are doing this, the 01 needles won't fit because the stems are too short. I actually had to glue on the stems from my 02 needles to make it work.

Now here comes the artistic part. You have to paint the bottom portion of each needle with a medium coat of the white paint you bought from Michael's or other craft store. The more you put on, the dimmer the needles will be when finished. You also want to be able to see the needles when driving. If you have the black face gauges, they will be visible. Don't know about white face gauges. You can't paint them other colors or they won't transmit light! Only white and only a single layer to give a bit of opacity to them. If you leave them clear, the needle won't light up properly.
Okay, the needles are done and we still have a long way to go. The hard parts come next. And you thought preparing the needles was hard.
Take the plastic shield that sits underneath the faces. You will have to drill holes to place the LED lights in. I did one LED each for the temp and fuel, and two each for the speedo and tach. I will refer you to this web page where I got all the info for wiring the LEDs and resistors. There's even a diagram at the bottom. Here are the holes I drilled around the needle hole.
http://www.angelfire.com/fl5/import/indigloneedles.html

Here is what it looks like after all the soldering is done and connections are taped. This took me most of the day to do. You have to position everything properly, so the plastic cover will fit over the wiring. I just tried to position the LEDs in their holes while lowering the plastic cover back on.


https://www.civicforums.com/forums/h...blueglow24.jpg
You can see how I positioned the LEDs in the holes. One thing I forgot to add--you have to sand down the LEDS so they will fit better and diffuse the light. Just use some sandpaper. Use fine wetsand to smoothen the surface.
You're almost done!! Yay! Now after wiring everything, I put the cluster back in to test it. Put your needles back in the same way you took them out, and don't push them all the way down or they will stick. I tried the lighting without hooking up the LEDs and got nice amber colored needles. I almost wanted to keep the amber to match the rest, but it was too much work and money not to. This DIY probably cost me well over $400 and alot of time.
This is very important if you're using stock backlight bulbs for lighting: before you put the cluster back together, you need to grab scissors and electrical tape. Now as they are, the needles will have barely any blue to them due to the amber backlight overpowering them. Look at the plastic piece that you drilled the holes for LED bulbs in. You'll see plastic arms that go from the bulbs to the needle holes. These are light guides that direct light from the bulbs to the gauge needle holes. You will need to cut small pieces of e-tape and put them over each of the light arms to block the light coming from the bulbs. Note: If you use EL cable for the backlight, you don't have to cover the light guides.
Go take the finished cluster back to your car and plug it in. You can splice the red power wire into the illumination wire going in to the blue cluster plug. Don't know which wire, but it's in another DIY somewhere. I think it's the striped red wire with spots. This makes them turn on with the parking lights. Tap the black wire to a ground. That's it everyone!! Go for a long drive and enjoy your glowing blue gauges! By far one of the most time-intensive and difficult DIYs you'll do. But the results are well worth it. This is a mod very few people have done.

EXTRA SUPPLEMENT PICS FOR BLUE LED GAUGES


Everything you need to know about making your needles, gauge lights, console lights, power window switch, and shifter lights (auto only) blue is in this DIY now.
If you attempt this project, please read through all the posts made here. There were numerous updates and discoveries made after the DIY was written (some by me, and some by other members).
IMPORTANT NEW UPDATE!! ******************
After only a few weeks, the blue backlight bulbs for the cluster have started to fade. I've tried numerous methods to fix this. White LEDs did not work, nor did newly painted bulbs. I decided to try blue EL wire. What I did was run the wire inside the cluster on the back of the gauges. I had enough wire (5 ft) to run it twice.
I actually got a second and third EL kit and added another two layers to each gauge. The wires were placed on the tick marks and the numbers to get an even light. The wire lights up blue normally, but in the cluster it gives a bright aqua color. It still looks nice and gives more even lighting than just bulbs.
I also taped off the smaller tick marks and the km/h numbers from the back, so only the big marks and numbers would light up. Looks better like this.
NEW NOTES AND ADDITIONS: ****************
One thing I did want to change involves painting the needles. Once you clear them using alcohol, you want to brush on a medium coat of white paint on the bottom only (not the top). And only paint the bottom part that sticks out of the holder. The part inside the round holder is already white from the holding clip.
After some thinking and planning, I've decided to go for an all blue interior. Here's what I did.
+ Redid entire dash with blue LEDs. For the control *****, I used 2 LEDs for each of the two bulbs in there and pointed the LED outward. I also used one LED for each of the other buttons (A/C, defrost, recirculate). I used only 1 LED for the voltmeter. Everything came out so good for a change. The control ***** use light guides to channel light, so they won't be as bright as the rest of them.
+ I also took out the bulbs that light up the shift indicator on the gauges in an automatic car. This was the only way to keep everything blue and matching. And also the cruise bulb, so it doesn't light up green on the gauges when it's on.
Finished product!
BASIC LED HOOKUP:
If any of you are wondering what a LED or resistor is and how to connect them, here it is. LED stands for light emiting diode. Basically a cup in the center of the plastic casing uses electrical energy to excite photons and give off light of a certain wavelength from the electromagnetic spectrum. An LED has two wires coming out of it. The longer one is the positive, and the shorter one is negative. Now you can't just hook it up to a 12V power source, or it will burn out. You need a resistor in front of the power lead to limit the amount of current that reaches it. Different colored LEDs have different voltage requirements. For blue and white, it's usually 3.5-3.7V. I used a 680ohm 1/2watt resistor for each blue LED. I've since found a calculator that says 560 ohm would be the optimal, since it would make them slightly brighter. Here's a diagram on how to hook them up. I would solder the connections, although you can twist them together and use e-tape if you want.
Now you can hook up multiple LEDs in series for a single circuit. I would recommend no more than three in a row. Just hook the ground lead from the first LED to a resistor, and then to the power lead of the second LED.
UPDATE AND NEW DIY--EL GAUGE BACKLIGHT (Indiglo)
Now here is how I did the backlight for the gauge faces. You still need to clear the back side with acetone to get rid of the stock color. Using the EL cable, it is possible to get even lighting for all the numbers on the gauge cluster. Here are some pics that show exactly where the cable was run. This is from the back side, with the circuit board removed. I used the supplied super glue to bond the cable to the plastic. Big mistake because it clouded the plastic shield. I used three kits of 5ft wire each to get it bright enough and light up all the numbers.
Then you wire them up just like indiglos. Power and ground, plus the plug to the inverter. I hid the small box to the right of the cluster in a hole, so it's out of the way. For some reason, I had some connection problem, so make sure they're spliced well. I may have to open it up and check it later. Finally I found a practical use for a ricey product
Now this is what happened after I did the initial install. I put superglue everywhere to keep the wire in place, and it totally messed up the plastic cover.
There were much worse spots where the light output was less. So I grabbed the trusty soldering iron and started melting out pieces of the light shield that were messed up. Be careful to try and keep it in one piece so everything goes back on right. And open a window cause you don't want to be smelling glue and plastic fumes! It really burns the eyes. Anyway, here's what I did to all the plastic that was covering the numbers. Once you're done, you need to go back and melt down the plastic that's sticking up around the edges, so the faces will fit back on properly.
Keep in mind that I only had to do this because of the glue. If you use tape or something to attach the wire, then the stock plastic shield should not block the light. One other thing I did was add chrome paper underneath the wires to reflect more light up to the gauges.
UPDATE AND NEW DIY--POWER WINDOW SWITCH (Blue LED)
**This was by far the hardest part of this entire DIY. I got so frustrated trying to do this. You need alot of patience to get it right. The pics are just to see how stuff comes apart. Most of it is either held on by tabs, clips, or screws. The door panel does not need to come off to get the window assembly out. You will also need very thin magnet wire to set everything up. Thicker wire won't fit between the two halves of the assembly. One of the hard parts is to make sure the driver window switch works mechanically after putting the LED inside. The LED must be shaved down alot for it to fit. I just cut out the factory LED that was in there.
Now here is the wiring part. I found out which two wires have to be tapped for ground and power. The ground on the plug is the black wire, and positive wire is the yellow one where my finger is pointing. I stripped a small section of each thick wire and then wrapped magnet wire around it to make the connection. Just be sure and tape everything up.
https://www.civicforums.com/forums/h...blueglow11.jpg
Just don't forget the 680ohm resistor before the LED to reduce the power coming in. I forgot and had to do everything all over again. You can imagine how pissed I was.
UPDATE AND NEW DIY: SHIFTER LIGHTS FOR AUTOMATIC
I've finally tried to do this again and got very good results. Here are some pics of what I did.
First you will need to take out the center console and pry off the shifter trim. You are trying to get to the plastic piece that has the P, R, N, D letters on it. Here is the backside of that piece. Now last time, I tried to use acetone on the #1 icon on the bottom. You can see that it totally stripped the paint away.
Here is what you need to do. Get some tissues and a bottle of 95% alcohol from the store. No acetone!! Now you want to slowly rub the tissue with alcohol on it to remove the layers one at a time. The first layer that comes off is the white on the very back. Then you should start to see a green layer underneath that (may be red or orange on a coupe). Gently rub the green off until you can see white underneath. Be very careful not to take off the last layer of white. Just go over the green parts until most of the color is gone. Don't mess up!! If you take off the last layer of white paint, you're buying a new shift assembly from Honda for $55!
Here it is with all the numbers and letters done. Just take your time and it will work. The alcohol is not powerful enough to take off the surrounding black paint, but it will take off the white from the numbers. Be careful.You can still see a small amount of green around the edges, but that's okay.
Now that the numbers and letters are cleared, you can install the blue LEDs. I got three altogether. One goes under the R, and the other two go under the D, D3, and 2 icons.
IMPORTANT--Take some white office paper and cut a piece to fit under the plastic piece. This is to dim the light to match the rest of the dash. Without this, it wil be extremely bright.
The P and N letters have paint that is just too dark for the blue light to illuminate. They will be dark. Still looks great at night.
UPDATE AND FINAL DIY ADDITION--moonroof, mirror, and cruise lights!
Okay, as most of you know I gave up on this a while back and said it was impossible. Well, here we are after a third all-day attempt. I finally got it to work.
Basically, I used one LED for the mirror button, one for cruise, and three for the moonroof switch (hardest). You really need thin, coated magnet wire to do this. I did the moonroof as 3 LEDs in the same series circuit. The top and bottom LEDs I had to grind way down so they would fit. The third one is in the middle. The hardest part is getting everything in there and having it light up correctly. As you can see, it's still not lit up perfectly, but it's good enough for me. Here are some pics to ponder over.
You really have to go out and hook everything up to play with the direction of the LEDs so everything faces forward. I didn't have the patience to do this to everything and ended up leaving the bottom light the way it was.
Once you have all the switches taken apart, put the back portion in the assembly and then feed the LEDs and wires through the original light bulb hole. Otherwise you won't be able to push the switch back in. Good luck, you're gonna need it for this one.
START OF NEEDLE DIY:
I've had many requests for a DIY on this already, so here goes. I'm watching Jerry Springer while doing this, so I may have left some things out. This DIY is for a sedan, but will probably be similar to the coupe as well. You should not try this unless you're familiar with soldering and taking your entire gauge cluster apart.
If you have an 01 civic, the DIY should be easy. I had an 02, so this will cover how to use parts from an 01 cluster to make it work.
Basic parts needed:
-big toolkit of some kind with screwdriver and other stuff
-soldering gun with accessories
-blue LED lights (6) or other color
-680ohm resistors (4)
-power drill with bits
-white transparent glass paint
-liner brush for painting
-electrical tape
-18 gauge wire (black/red)
-acetone
-90% ethyl alcohol
-many more things that I'll mention along the way...
Let's begin. Here's what started this project. My ruined 02 cluster face with paint all over.
First, I tried taking my 02 needles apart and broke them in the process. They won't go back together. lol--at first I tried painting the needles blue, but it will be very dim. The needles are orange plastic on the 02, so you need the needles from an 01 in order to continue.
Here is my new 01 cluster off ebay for $85. I like the black face much better.
When you take the gauges apart, notice the layer of paint on the back side. This gives the gauge lights a nasty greenish color. I used a cotton cloth and lots of acetone to clear off all the paint on the back side only! This will make light shine through the gauges much better. Now don't forget to tape off the parts on the back that have the signal, brights, ABS, etc icons. You could use condoms to change the backlight color, but it will be dimmer. Be very careful with the acetone and tape off the front side or they will end up ruined like mine in the first pic.
Now I'm going to start describing how to do the blue glow needles. I won't go into detail here, but you need to completely remove your cluster from the car and bring it inside. Pop open the front so you have access to the needles. Make sure the speedo and tach needles are at the stop points and pull them straight up while grasping low on the needle. Put the gas and temp needles down to their stop points and pull them out. NOTE: I've pulled out my needles at least 20 times and have had no problems with them not working. Once the needles are apart, you'll want to separate all the parts. Stick a thin knife into the sides of the bottom of the needle and gently pry up. The bottom should eventually pop off.
Once they are all apart, take the clear needle and examine it. You should see a painted orange stripe on the top and bottom. Using 90% ethanol (alcohol) and a soft cloth, gently wipe off the paint. DO NOT use acetone to do this or you will cloud the plastic!
Now if you have an 02 cluster and are doing this, the 01 needles won't fit because the stems are too short. I actually had to glue on the stems from my 02 needles to make it work.
Now here comes the artistic part. You have to paint the bottom portion of each needle with a medium coat of the white paint you bought from Michael's or other craft store. The more you put on, the dimmer the needles will be when finished. You also want to be able to see the needles when driving. If you have the black face gauges, they will be visible. Don't know about white face gauges. You can't paint them other colors or they won't transmit light! Only white and only a single layer to give a bit of opacity to them. If you leave them clear, the needle won't light up properly.
Okay, the needles are done and we still have a long way to go. The hard parts come next. And you thought preparing the needles was hard.
Take the plastic shield that sits underneath the faces. You will have to drill holes to place the LED lights in. I did one LED each for the temp and fuel, and two each for the speedo and tach. I will refer you to this web page where I got all the info for wiring the LEDs and resistors. There's even a diagram at the bottom. Here are the holes I drilled around the needle hole.
http://www.angelfire.com/fl5/import/indigloneedles.html
Here is what it looks like after all the soldering is done and connections are taped. This took me most of the day to do. You have to position everything properly, so the plastic cover will fit over the wiring. I just tried to position the LEDs in their holes while lowering the plastic cover back on.
https://www.civicforums.com/forums/h...blueglow24.jpg
You can see how I positioned the LEDs in the holes. One thing I forgot to add--you have to sand down the LEDS so they will fit better and diffuse the light. Just use some sandpaper. Use fine wetsand to smoothen the surface.
You're almost done!! Yay! Now after wiring everything, I put the cluster back in to test it. Put your needles back in the same way you took them out, and don't push them all the way down or they will stick. I tried the lighting without hooking up the LEDs and got nice amber colored needles. I almost wanted to keep the amber to match the rest, but it was too much work and money not to. This DIY probably cost me well over $400 and alot of time.
This is very important if you're using stock backlight bulbs for lighting: before you put the cluster back together, you need to grab scissors and electrical tape. Now as they are, the needles will have barely any blue to them due to the amber backlight overpowering them. Look at the plastic piece that you drilled the holes for LED bulbs in. You'll see plastic arms that go from the bulbs to the needle holes. These are light guides that direct light from the bulbs to the gauge needle holes. You will need to cut small pieces of e-tape and put them over each of the light arms to block the light coming from the bulbs. Note: If you use EL cable for the backlight, you don't have to cover the light guides.
Go take the finished cluster back to your car and plug it in. You can splice the red power wire into the illumination wire going in to the blue cluster plug. Don't know which wire, but it's in another DIY somewhere. I think it's the striped red wire with spots. This makes them turn on with the parking lights. Tap the black wire to a ground. That's it everyone!! Go for a long drive and enjoy your glowing blue gauges! By far one of the most time-intensive and difficult DIYs you'll do. But the results are well worth it. This is a mod very few people have done.
EXTRA SUPPLEMENT PICS FOR BLUE LED GAUGES
Last edited by gearbox; 01-15-2011 at 03:58 PM.


 12-07-2003
#9
Premium Member
Hey! Look At Me!! I'm a Supporting Member!!
Thread Starter
iTrader: (95)
Join Date: Sep 2002
Location: NV
Age: 43
Posts: 51,241
Likes: 0
Received 18 Likes
on
13 Posts
Rep Power: 787 I used to think everything was too hard. But with directions, anything can be done. Here's a quick summary.
1) Take cluster out and pull off needles. Use alcohol to clear the needles, then paint them with thin coat of white on top.
2) Drill holes for LEDs and wire everything together.
3) Put tape to block the light guides, and reassemble everything.
The part that takes the longest is the wiring, although most of it is just time-consuming and not really hard. It's much easier with an 01 civic.
Oh and that red strip of tape in the cluster is to make the D, R, D3, 2 indicators light up red instead of green (like they do in P and N).

 12-07-2003
#11
Premium Member
Hey! Look At Me!! I'm a Supporting Member!!
Thread Starter
iTrader: (95)
Join Date: Sep 2002
Location: NV
Age: 43
Posts: 51,241
Likes: 0
Received 18 Likes
on
13 Posts
Rep Power: 787 Thanks someone for making this sticky!!
Okay, here is the thing with the lighting. It is not because of those holes on the top of the cluster. When you acetone the back of the gauge face to make more light come through, the places where the backlight bulbs are located will be brighter. The paint that you remove is graded, so that the light will be even. It's not a big problem, and there's no way around it if you want brighter lights. The pic is with a longer exposure, but otherwise it's less noticable.
As for the blue glow--this happened because I didn't pay that much attention to the LED direction. If you sit in the passenger seat, there is one LED that shines right in your eye, lol. Some of them are just at an angle, and since the needles aren't pushed down all the way, some of it escapes.
Here's a pic with regular exposure. The amber color is a bit off, but it looks like the color from a regular light bulb. You really have to see them in person to get the real effect. I'll post more pics with my stereo and neons on later.
 12-07-2003
#13
Registered!!
Join Date: Jan 2003
Age: 50
Posts: 526
Likes: 0
Received 0 Likes
on
0 Posts
Rep Power: 0 Excellent DIY gearbox, I am definitely doing the needle portion of it. This should be placed in the DIY section, since none of other ones go over changing the needle color.
12-07-2003
#14
Tell me what you don't like about yourself....
Hey! Look At Me!! I'm a Supporting Member!!
iTrader: (12)
Join Date: Oct 2002
Location: Columbia, SC, USA
Age: 42
Posts: 12,576
Likes: 0
Received 0 Likes
on
0 Posts
Rep Power: 388 Originally posted by gearbox
Thanks someone for making this sticky!!
Thanks someone for making this sticky!!

 12-07-2003
#15
Premium Member
Hey! Look At Me!! I'm a Supporting Member!!
Thread Starter
iTrader: (95)
Join Date: Sep 2002
Location: NV
Age: 43
Posts: 51,241
Likes: 0
Received 18 Likes
on
13 Posts
Rep Power: 787 Norrinradd--post some pics when you get it all done.
Also, you can use any color LED for this. I know someone thinking of doing white needles since the rest of his dash is blue. Just be sure you follow the wire diagram EXACTLY as shown, or you could blow the LEDs or cause a fire. One LED cost me $4!
Here is a final pic of everything put back together.
Last edited by gearbox; 12-07-2003 at 03:00 PM.
12-07-2003
#17
Premium Member
Hey! Look At Me!! I'm a Supporting Member!!
Thread Starter
iTrader: (95)
Join Date: Sep 2002
Location: NV
Age: 43
Posts: 51,241
Likes: 0
Received 18 Likes
on
13 Posts
Rep Power: 787 Total cost for me...hmmm
New 01 cluster from ebay-$85
6 LEDS, 4 resistors, wire-$30
paint and other supplies-$20
I got alot of other stuff that I didn't end up using, so for me it was close to $200 total. Sucks.
If you have an 01 and doing the same thing, it shouldn't be more than $50 and lots of time.
New 01 cluster from ebay-$85
6 LEDS, 4 resistors, wire-$30
paint and other supplies-$20
I got alot of other stuff that I didn't end up using, so for me it was close to $200 total. Sucks.
If you have an 01 and doing the same thing, it shouldn't be more than $50 and lots of time.
 12-07-2003
#20
Premium Member
Hey! Look At Me!! I'm a Supporting Member!!
Thread Starter
iTrader: (95)
Join Date: Sep 2002
Location: NV
Age: 43
Posts: 51,241
Likes: 0
Received 18 Likes
on
13 Posts
Rep Power: 787 Yes. I put a thicker coat on and could barely see any light. You just need a thin layer so you can see the needles during the day. I painted each one many times before everything matched. The paint just wipes off so you can try it as many times as necessary.
 12-07-2003
#22
Premium Member
Hey! Look At Me!! I'm a Supporting Member!!
Thread Starter
iTrader: (95)
Join Date: Sep 2002
Location: NV
Age: 43
Posts: 51,241
Likes: 0
Received 18 Likes
on
13 Posts
Rep Power: 787 If you guys want, you can just clear the needles and let the amber light shine through. It's still bright and matches the backlight pretty well.
12-08-2003
#24
Premium Member
Hey! Look At Me!! I'm a Supporting Member!!
Thread Starter
iTrader: (95)
Join Date: Sep 2002
Location: NV
Age: 43
Posts: 51,241
Likes: 0
Received 18 Likes
on
13 Posts
Rep Power: 787 UPDATE: When you block the light guides with electrical tape--the guide will no longer channel light to the needles (good), but it will also not light up to provide backlight to the gauge faces (bad). I noticed the backlight was a little dimmer than usual, but it is still bright in my case. If you're using bulb condoms, it will be much worse. Something to consider if you're trying this. I tried red bulb condoms to see, and it's quite a bit dimmer. The best way is to get some after market reverse indiglo or something.
Thank you guys for the comments. I'm glad there are still some members here that care about modding their car. Some of the noobs lately are really abusing this site.
Thank you guys for the comments. I'm glad there are still some members here that care about modding their car. Some of the noobs lately are really abusing this site.
Last edited by gearbox; 12-08-2003 at 09:04 PM.
12-09-2003
#25
Registered!!
Join Date: Nov 2003
Location: SC, USA
Age: 38
Posts: 457
Likes: 0
Received 0 Likes
on
0 Posts
Rep Power: 0 ok, now if i had aftermarket gauges over the stock ones, couldnt i just change the regular gague bulbs to blue ones (LED) since i wouldnt have to worry about the blue going to the stock gagues? And then all i would have to do is take the orange paint off the needles?
12-09-2003
#26
Premium Member
Hey! Look At Me!! I'm a Supporting Member!!
Thread Starter
iTrader: (95)
Join Date: Sep 2002
Location: NV
Age: 43
Posts: 51,241
Likes: 0
Received 18 Likes
on
13 Posts
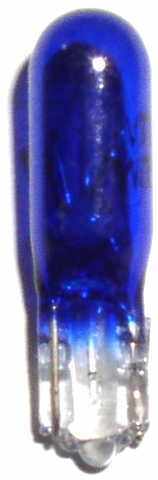
Rep Power: 787 Okay, I first cleared the needles and tried them without the blue LED setup plugged in. They lit up a bright amber color. Now what you're saying is possible and alot easier. You don't even have to use an LED setup. Autolumination.com sells blue bulbs that you can just swap with the five stock backlight bulbs. The blue will channel through the light guides and into the needles no problem. Just make sure it's an 01 cluster, cause the website doesn't carry the colored bulbs for an 02. They even have super white replacement bulbs if you wanted to try that for contrast. I don't know how bright the blue bulbs would be, but I imagine it should be okay. If that doesn't work, you can always try the hyper white.
http://autolumination.com/74.htm
You want the incandescent bulbs, not the LEDs.
By the way, your setup looks really nice.
http://autolumination.com/74.htm
You want the incandescent bulbs, not the LEDs.
By the way, your setup looks really nice.
Last edited by gearbox; 12-09-2003 at 12:20 PM.
12-09-2003
#27
Premium Member
Hey! Look At Me!! I'm a Supporting Member!!
Thread Starter
iTrader: (95)
Join Date: Sep 2002
Location: NV
Age: 43
Posts: 51,241
Likes: 0
Received 18 Likes
on
13 Posts
Rep Power: 787 I wonder why Norrinradd didn't use bulbs for his setup. He cleared the back of the gauges like I did, so they would be bright. The only thing is the rest of the dash lights would have to be changed to LEDs to match. Too much work. I'm gonna scream if I have to take apart that cluster one more time!


